You’ve got your beautiful cuts of meat, freshly picked vegetables, or a big batch of chili ready for the freezer. You grab your trusty vacuum sealer, place the bag, and press the “Seal” button… only to be met with a weak, incomplete, or non-existent seal. It’s a frustrating moment we’ve all faced. Before you think about buying a whole new machine, let me tell you about a common culprit that’s surprisingly easy to fix. Learning How To Replace Vacuum Sealer Heating Strip components is a game-changer, and it’s a skill that can save you money and get your food preservation game back on track in minutes. Think of it as a simple tune-up for one of the hardest-working appliances in your kitchen.
Why the Heating Strip is So Important
So, what exactly is this little part and why does it cause so much trouble? The heating strip, or heating element, is the thin wire located under a protective layer of tape on your sealer’s sealing bar. When you hit that seal button, electricity flows through this wire, causing it to heat up instantly. This heat melts the plastic of the vacuum sealer bag, fusing the two sides together to create that all-important airtight seal.
The brown, often slightly sticky tape covering it is a high-temperature resistant Teflon tape. Its job is twofold:
- It prevents the melted plastic bag from sticking directly to the hot wire.
- It insulates and distributes the heat evenly for a consistent seal.
Over time and after hundreds of seals, both the wire and the tape wear out. It’s not a matter of if, but when.
Telltale Signs Your Heating Strip Needs Replacing
Not sure if the heating element is the problem? Your vacuum sealer will usually give you some pretty clear signals. If you’re experiencing any of the following, it’s time for a closer look.
- Weak or Incomplete Seals: This is the most common symptom. The bag seems sealed, but it loses its vacuum in the freezer, or you can pull the seal apart with little effort.
- No Seal at All: The machine goes through the motions, but the bag doesn’t seal. If you touch the sealing bar (carefully, right after a cycle!), it might not feel hot.
- Uneven or “Spotty” Seals: You see sections that are perfectly sealed next to areas that aren’t sealed at all, creating channels for air to get in.
- Visible Damage: Upon inspection, you might see the Teflon tape is burned, peeling, or has a hole in it. The heating wire underneath might be broken, blackened, or corroded.
As food preservation specialist Eleanor Vance puts it, “The integrity of your seal begins and ends with the health of your heating element. A simple, two-minute replacement can be the difference between food lasting for months versus weeks.”
What You’ll Need for the Job
The good news is, you don’t need a full mechanic’s toolkit for this. The process is straightforward, and the parts are inexpensive.
- A Replacement Kit: Most importantly, you need a new heating strip and Teflon tape. These are often sold together in kits specific to your machine’s brand and model. Always check your user manual or the manufacturer’s website for the correct part number. Using the wrong size wire can damage your machine.
- Small Flathead Screwdriver or Pliers: To gently pry up and remove the old components.
- Rubbing Alcohol and a Cloth: For cleaning the sealing bar channel before installing the new strip.
- Scissors: To trim the new Teflon tape to the perfect length.
|
Our Picks for the Best Food Vacuum Cealer in 2026
As an Amazon Associate, we earn from qualifying purchases.
|
||
| Num | Product | Action |
|---|---|---|
| 1 |

|
|
| 2 | NutriChef Automatic Vacuum Air Sealing System for Food Preservation with Starter Kit, Compact Design, Lab Tested, Dry & Moist Food Modes with Led Indicator Lights, Black |
|
| 3 | Chef Preserve Compact Vacuum Sealer for Food (Vacuum Sealer Machine + 30 Reusable Vacuum Bags) Powerful Handheld Vacuum Sealer Machine, Seal Meal Saver, Portable Food Sealer |
|
| 4 | FoodSaver Compact Vacuum Sealer Machine with Airtight Bags and Roll - Ideal for Sous Vide and Airtight Food Storage, White |
|
| 5 | Nesco Deluxe Food VS-12 Vacuum Sealer, 130 Watts, Kit Bags & Viewing Lid, Compact, Silver |
|
| 6 | Vacuum Sealer Machine Powerful 90Kpa Precision 6-in-1 Compact Food Preservation System with Cutter, 2 Bag Rolls & 5 Pre-cut Bags, Widened 12mm Sealing Strip, Dry&Moist Modes (Silver) |
|
| 7 | SEATAO VH5188 Automatic Vacuum Sealer Machine, 90kPa Multifunction Commercial Vacuum Food Sealer For Food Preservation, Dry & Moist & Food & Extended Modes, LED lights, Double Seal |
|
| 8 | FoodSaver Vacuum Sealer Machine, Automatic Bag Detection, Sous Vide Friendly, with sealer bags, roll, handheld vacuum sealer, black |
|
| 9 | Vakumar Liquid Vacuum Sealer Machine, 90Kpa Vacuum Sealer Machine Preservation Dry/Moist/Liquid Modes, LED Indicator Light, Handle Locked Design, Built-in Cutter and Bag Storage, Removable Drip Tray |
|
| 10 | FoodSaver V4400 2-in-1 Vacuum Sealer Machine with Automatic Vacuum Sealer Bag Detection and Starter Kit |
|
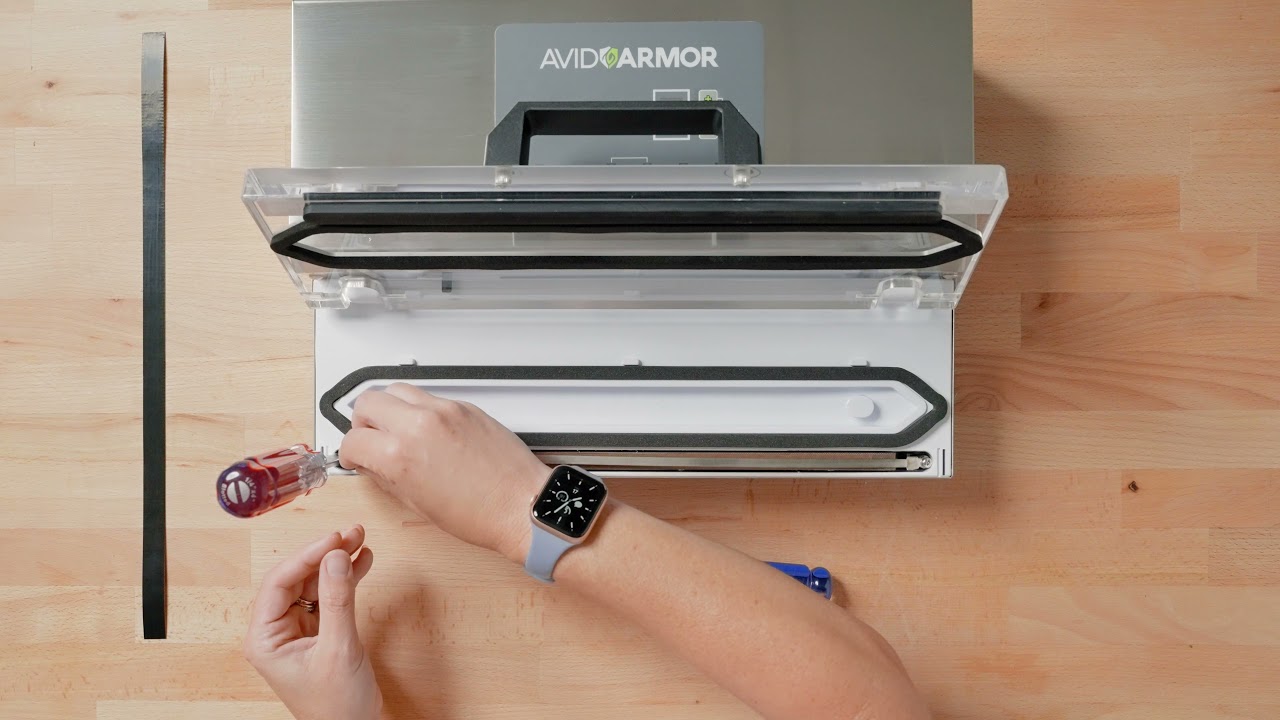
How to Replace Vacuum Sealer Heating Strip: A Step-by-Step Guide
Alright, let’s roll up our sleeves and get this done. I remember the first time I did this; I was nervous I’d break something, but I was shocked at how simple it was. Just follow these steps carefully.
- Unplug Your Machine: This is the most important step. Never work on an electrical appliance while it is plugged in. Safety first, always.
- Access the Sealing Bar: Open the lid of your vacuum sealer. Locate the sealing bar—it’s the raised platform where the magic happens. You’ll see the thin strip of brownish or black Teflon tape.
- Remove the Old Teflon Tape: Gently peel back the old tape. It might be a bit brittle or sticky, so take your time. It’s usually just held on by adhesive. Once it’s off, you’ll see the thin heating wire underneath, sitting in a shallow groove.
- Remove the Old Heating Wire: The wire is usually held in place by small terminals at each end. You might need to gently pry the ends of the wire out from under these terminals with a small screwdriver or a pair of tweezers. Be gentle! You don’t want to damage the terminal posts. Once both ends are free, lift the entire wire out of its channel.
- Clean the Area Thoroughly: This step is crucial for a good connection and a perfect seal. Take a cloth lightly dampened with rubbing alcohol and wipe down the entire channel where the wire and tape were. Remove any old adhesive residue, carbon buildup, or gunk. Let it dry completely.
- Install the New Heating Wire: Take your new wire. It should have little loops or hooks on each end. Carefully hook these ends onto the terminal posts where the old wire was. Make sure the wire sits flat and snug down in its channel. It shouldn’t be too loose or too tight. A properly seated wire is key to even heating.
- Apply the New Teflon Tape: Cut a piece of your new Teflon tape that is slightly longer than the heating element channel, extending about half an inch past the terminals on each end. Peel off the adhesive backing and carefully apply it over the new heating wire. Start at one end and smooth it down firmly with your finger, ensuring there are no air bubbles or wrinkles. A smooth surface guarantees a perfect, even seal on your bags.
- Final Check and Test: Close the lid of your sealer a few times to make sure everything sits correctly. Now, plug it back in. Grab a spare vacuum sealer bag and perform a “seal only” function. Examine the seal. It should be clear, consistent, and strong. You’ve just successfully learned how to replace vacuum sealer heating strip components.
Troubleshooting After Replacement
What if it’s still not working perfectly? Don’t panic. Here are a couple of common hiccups.
Why is my vacuum sealer melting the bag?
If your new seal is melting straight through the bag, it’s likely one of two things. First, ensure you installed the Teflon tape; without it, the raw heat is too intense. Second, you may have installed a heating wire that is too thick or has the wrong resistance for your model. Double-check you have the correct OEM or equivalent part.
Why is the seal still weak?
A weak seal after replacement often points to a poor connection. Unplug the machine again and ensure the ends of the heating wire are securely attached to the terminals. Also, check that the new Teflon tape is smooth and flat, with no debris trapped underneath it. Sometimes, a worn-out [lid gasket] can also be the culprit, preventing proper pressure during the sealing cycle.
Frequently Asked Questions (FAQ)
Q: How often should I replace my vacuum sealer heating strip?
A: There’s no set schedule. It depends entirely on your usage. For heavy users (sealing dozens of items weekly), you might need to do it once a year. For casual users, it could last several years. The best indicator is the quality of your seal; once it starts to degrade, it’s time for a change.
Q: What is the Teflon tape on a vacuum sealer for?
A: The Teflon tape is a non-stick, heat-resistant barrier. It sits between the hot heating wire and the plastic bag, preventing the bag from melting onto the wire and ensuring the heat is distributed evenly for a clean, strong seal.
Q: Can I just replace the Teflon tape and not the wire?
A: You can, and sometimes that’s all that’s needed! If the tape is burned or peeling but the wire underneath looks clean and intact, simply replacing the tape might solve your problem. It’s the cheaper first step in troubleshooting.
Q: Are all vacuum sealer heating strips the same?
A: No, they are not. Heating strips vary in length, width, and electrical resistance depending on the make and model of the vacuum sealer. Using the wrong one can lead to poor performance or even damage your machine. Always buy the specific replacement part recommended by the manufacturer.
Q: My sealer still won’t seal after I replaced the strip. What else could be wrong?
A: If a new heating strip and tape don’t solve the problem, check the lid gasket for cracks or compression. An improper seal can also be caused by a faulty pressure sensor or, in rare cases, a problem with the machine’s internal electronics. However, the heating strip is the cause over 90% of the time.
A Skill That Pays for Itself
There you have it. You’re now equipped with the knowledge to perform one of the most common and effective vacuum sealer repairs yourself. This simple maintenance task not only extends the life of your appliance but also ensures that every bag you seal is perfectly preserved, protecting your food and your budget. The next time your machine acts up, you’ll know exactly what to do. So go ahead, give that hard-working sealer the tune-up it deserves and get back to sealing with confidence. Learning how to replace vacuum sealer heating strip parts is a small investment of time for a huge return in performance.