So, you’ve brought home a shiny new vacuum sealer, a modern marvel promising to banish freezer burn, extend the life of your groceries, and save you a heap of cash. Fantastic! But as you stand there with a roll of plastic and a beautiful cut of steak, you might be thinking, “Now what?” Knowing How To Use Vacuum Sealer Bags Correctly is the real secret sauce to unlocking this gadget’s full potential. It’s the difference between perfectly preserved food and a frustrating, poorly sealed mess.
Don’t worry, I’ve been there. My first attempt involved a leaky bag of marinated chicken that was… less than ideal. But through years of trial, error, and sealing just about everything in my kitchen, I’ve mastered the art. And today, I’m going to share everything you need to know to go from a sealing novice to a preservation pro. Let’s dive in and turn that plastic bag into a powerful tool for freshness. For those looking to get the most out of their investment, understanding the fundamentals of maintenance is key. You can learn more about how to extend vacuum sealer lifespan in our detailed guide.
What’s the Magic Behind Vacuum Sealing?
Ever wonder how vacuum sealing actually works? It’s beautifully simple science. The machine does two key things: it sucks all the oxygen out of the bag and then creates an airtight, heat-sealed closure. Oxygen is the primary enemy of fresh food; it fuels the growth of mold, yeast, and bacteria, and it causes that dreaded freezer burn. By removing the oxygen, you’re essentially hitting the pause button on the spoilage process.
The benefits are huge:
- Extended Freshness: Food can last up to 3-5 times longer than with traditional storage methods.
- No More Freezer Burn: That icy, discolored layer on your frozen meat? Gone. Freezer burn happens when air comes into contact with the food’s surface, and an airtight seal prevents that completely.
- Save Money: Buy in bulk, preserve leftovers, and stop throwing away spoiled produce. Your wallet will thank you.
- Perfect for Sous Vide: A perfect vacuum seal is non-negotiable for sous vide cooking, ensuring even heat transfer.
- Marinate in Minutes: The vacuum pressure opens up the pores in meat, allowing marinades to penetrate deeply in a fraction of the time.
The Ultimate Guide: How to Use Vacuum Sealer Bags Correctly
Alright, let’s get to the main event. Using your sealer might seem intimidating, but it’s a straightforward process once you get the hang of it. Just follow these steps, and you’ll be sealing like a pro in no time.
- Choose and Prepare Your Bag
If you’re using a roll, first decide how much length you need. A good rule of thumb is to leave at least 3-4 inches (about 8-10 cm) of extra space beyond your food. Use your sealer’s built-in cutter or a pair of scissors to cut the bag. Then, use the “Seal” function on your machine to create the bottom seal. Make sure it’s a straight, complete line with no wrinkles. - Prep Your Food Like a Pro
This is arguably the most crucial step. Proper prep prevents sealing failures and ensures the best quality.- Wet or Moist Foods: Pat meats, fish, and poultry dry with a paper towel before bagging. For very moist items like ground meat, a little trick is to fold a paper towel and place it inside the bag, between the food and the seal area, to absorb excess liquid.
- Liquids and Soups: You can’t vacuum seal pure liquids without a chamber sealer. The workaround? Pre-freeze them! Pour soup, broth, or sauce into an ice cube tray or a container until solid, then pop the frozen blocks into a bag and seal.
- Sharp Items: Bones, pasta, or other sharp edges can puncture the bag. Wrap them in a small piece of paper towel or wax paper to cushion the points before sealing.
- “Squishy” Foods: Soft items like bread or delicate berries can be crushed by the vacuum pressure. Pre-freeze them on a baking sheet for an hour or two until firm, then transfer to a bag to seal.
- Fill the Bag (But Don’t Go Overboard!)
Place your prepped food into the bag. The golden rule is to leave at least 3 inches of headspace between the food and the open end of the bag. This space is essential for two reasons: it gives the machine enough room to get a good grip and ensures no food particles or moisture interfere with the heat seal. - Position the Bag in the Sealer
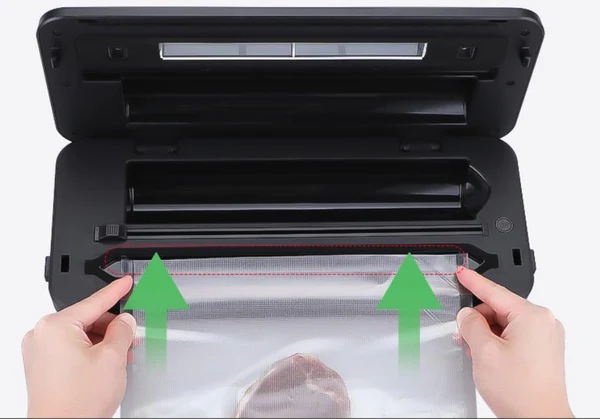
This is where many beginners trip up. Open the lid of your vacuum sealer and carefully place the open end of the bag into the vacuum channel or drip tray (check your machine’s manual for the exact spot). Make sure the bag is flat and smooth across the sealing bar, with no wrinkles or folds. An uneven bag leads to an incomplete seal. - Lock, Vacuum, and Seal
Close the lid of your sealer and lock it firmly in place—you’ll often hear a “click.” Now, press the “Vacuum & Seal” button. The machine will whir to life, sucking the air out. You’ll see the bag tighten around the food. Once all the air is removed, the machine will automatically switch to the sealing function, using heat to create the final, airtight closure. - Inspect and Label Your Work
Once the machine finishes, unlock the lid and remove your perfectly sealed package. Give the seal a quick check. It should be a clear, solid line with no gaps, wrinkles, or milky spots. If it looks incomplete, it’s best to cut it off and seal it again. Finally, use a permanent marker to label the bag with the contents and the date. Trust me, “mystery meat” from the back of the freezer is never a fun surprise.
Pro Tips to Seal Like a Seasoned Chef
Ready to take your skills to the next level? Here are a few tricks I’ve picked up over the years.
- Double Seal for Security: For liquids, long-term freezer storage, or sous vide cooking, I always double seal. Just make a second seal about a quarter-inch (1/2 cm) away from the first one. It’s a little extra insurance against leaks.
- Keep It Clean: Any food residue or moisture on the sealing bar can cause a weak seal. Wipe it down with a damp cloth between uses to keep it in top shape.
- Flash Blanch Vegetables: Vegetables from the cruciferous family (like broccoli, cabbage, and cauliflower) release gases as they age, which can cause the bag to inflate and spoil the contents. To prevent this, blanch them first: briefly boil them for a minute or two, then immediately plunge them into an ice bath to stop the cooking process. Dry them thoroughly before sealing.
As food preservation specialist Dr. Eleanor Vance often says, “The work you do before the food goes in the bag is just as important as the seal itself. Proper preparation is the foundation of long-term freshness and safety.”
|
Our Picks for the Best Food Vacuum Cealer in 2026
As an Amazon Associate, we earn from qualifying purchases.
|
||
| Num | Product | Action |
|---|---|---|
| 1 | Vacuum Sealer Machine Powerful 90Kpa Precision 6-in-1 Compact Food Preservation System with Cutter, 2 Bag Rolls & 5 Pre-cut Bags, Widened 12mm Sealing Strip, Dry&Moist Modes (Silver) |

|
| 2 | FoodSaver V4400 2-in-1 Vacuum Sealer Machine with Automatic Vacuum Sealer Bag Detection and Starter Kit |
|
| 3 | Chef Preserve Compact Vacuum Sealer for Food (Vacuum Sealer Machine + 30 Reusable Vacuum Bags) Powerful Handheld Vacuum Sealer Machine, Seal Meal Saver, Portable Food Sealer |
|
| 4 | NutriChef Automatic Vacuum Air Sealing System for Food Preservation with Starter Kit, Compact Design, Lab Tested, Dry & Moist Food Modes with Led Indicator Lights, Black |
|
| 5 | Nesco Deluxe Food VS-12 Vacuum Sealer, 130 Watts, Kit Bags & Viewing Lid, Compact, Silver |
|
| 6 |
|
|
| 7 | FoodSaver Compact Vacuum Sealer Machine with Airtight Bags and Roll - Ideal for Sous Vide and Airtight Food Storage, White |
|
| 8 | SEATAO VH5188 Automatic Vacuum Sealer Machine, 90kPa Multifunction Commercial Vacuum Food Sealer For Food Preservation, Dry & Moist & Food & Extended Modes, LED lights, Double Seal |
|
| 9 | FoodSaver Vacuum Sealer Machine, Automatic Bag Detection, Sous Vide Friendly, with sealer bags, roll, handheld vacuum sealer, black |
|
| 10 | Vakumar Liquid Vacuum Sealer Machine, 90Kpa Vacuum Sealer Machine Preservation Dry/Moist/Liquid Modes, LED Indicator Light, Handle Locked Design, Built-in Cutter and Bag Storage, Removable Drip Tray |
|
What Foods Can You Vacuum Seal?
While you can seal most things, some foods require a little extra care, and a few should be avoided altogether.
The Sealing Superstars (Foods to Seal)
- Meats and Poultry: Beef, chicken, pork, and fish are perfect candidates.
- Hard Cheeses: Prevents mold and drying out.
- Dried Goods: Flour, sugar, pasta, rice, and coffee beans stay fresh and pest-free.
- Fruits and Vegetables: Especially great for preserving seasonal harvests (remember to blanch or pre-freeze where necessary).
- Pre-made Meals: Perfect for meal prepping and portion control.
The No-Go Zone (Foods to Avoid or Prep First)
- Soft Cheeses: Cheeses like brie, ricotta, and blue cheese don’t fare well, as their texture and flavor can be ruined.
- Fresh Mushrooms: They ripen quickly and can decay faster inside a vacuum-sealed bag. It’s better to cook them first, then seal.
- Whole Raw Onions and Garlic: These release natural gases that will cause the bag to expand. If you want to seal them, it’s best to chop and cook or pre-freeze them first.
- Cruciferous Vegetables (Raw): As mentioned, broccoli, cauliflower, kale, and Brussels sprouts must be blanched before sealing.
How Do I Choose the Right Vacuum Sealer for Me?
Choosing the right vacuum sealer depends on your needs, but you should consider the machine’s type (edge vs. chamber), how often you’ll use it, and features like wet/dry settings or built-in bag storage. Making an informed choice ensures you get a device that fits your lifestyle perfectly. Similarly, knowing how to store vacuum sealer safely is crucial for protecting your appliance and ensuring it’s ready for action when you need it.
Frequently Asked Questions (FAQ)
Why isn’t my vacuum sealer bag sealing properly?
The most common culprits are moisture or food particles in the seal area, wrinkles in the bag, or not leaving enough headspace. Wipe the seal area clean, smooth the bag out, and make sure you have at least 3 inches of empty space at the top.
Can you reuse vacuum sealer bags?
Yes, you can! If you sealed dry goods like pasta or nuts, simply wash the bag thoroughly with soap and warm water, let it dry completely, and it’s ready to go again. I wouldn’t recommend reusing bags that held raw meat, fish, or greasy foods due to the risk of bacteria.
How long does vacuum-sealed food last in the freezer?
Properly vacuum-sealed food can last 2-3 years in the freezer without any loss of quality or freezer burn, compared to just 6-12 months with standard methods.
Do you need special bags for a vacuum sealer?
Absolutely. Vacuum sealer bags are designed with special channels or textures that allow air to be pulled out effectively. Regular plastic bags are too smooth and won’t work with an external/edge sealer.
Can I vacuum seal liquids like soup?
Yes, but you must freeze the liquid solid first. Pour the soup into a container or mold, freeze it, and then seal the frozen block in a bag. This prevents the liquid from being sucked into the machine’s motor.
Your Journey to Fresher Food Starts Now
There you have it—a complete roadmap on how to use vacuum sealer bags correctly. It’s a skill that will fundamentally change the way you shop, cook, and store food. You’ll be amazed at how much less food you waste and how much more flavor you lock in.
So go ahead, grab that bag, prep your food, and start sealing. Your freezer is about to become an organized library of delicious, perfectly preserved meals. What will you seal first?