You’ve done it. After months of watering, weeding, and waiting, your garden is bursting with life. You have baskets of vibrant tomatoes, piles of crisp green beans, and more zucchini than you know what to do with. It’s a glorious sight, but it comes with a ticking clock. How do you preserve that incredible, sun-ripened flavor before it all goes to waste? The answer, my friend, is a Vacuum Sealer For Garden Vegetables. Forget those flimsy freezer bags that lead to icy, tasteless produce. We’re talking about locking in freshness so perfectly that you can enjoy the taste of summer in the dead of winter.
So, you’re ready to level up your food preservation game? Fantastic. Think of me as your guide on this journey. As someone who has sealed everything from delicate herbs to hearty root vegetables, I’ve seen what works and what absolutely doesn’t. This article is your comprehensive roadmap, designed to turn you from a curious gardener into a vacuum-sealing pro.
Why a Vacuum Sealer is a Gardener’s Best Friend
Ever pulled a bag of green beans from the freezer, only to find them covered in a layer of frosty crystals? That’s freezer burn, and it’s the enemy of flavor and texture. It happens when air comes into contact with your food, causing moisture to evaporate and ice crystals to form.
A vacuum sealer tackles this problem head-on. The mechanism is brilliantly simple:
- You place your vegetables in a special, heavy-duty plastic bag.
- The machine sucks all the air out of the bag, creating a vacuum.
- It then uses a heated strip to melt the bag’s opening, creating an airtight seal.
By removing nearly all the oxygen, a vacuum sealer dramatically slows down the processes that cause food to spoil. This means:
- No More Freezer Burn: Without air, those damaging ice crystals can’t form. Your vegetables stay vibrant, firm, and delicious.
- Extended Shelf Life: We’re not talking about a few extra days. Vacuum-sealed vegetables can last up to 2-3 years in the freezer, compared to just 6-12 months in a standard freezer bag. You’ll be eating your garden’s bounty for a long time.
- Preserved Nutrients and Flavor: Oxygen degrades vitamins, color, and flavor. By removing it, you’re essentially freezing your vegetables in time, locking in all that goodness.
- Saves Money and Reduces Waste: Every vegetable you preserve is one you don’t have to buy later. It’s the ultimate way to honor your hard work and make your harvest go further.
As culinary preservation specialist Dr. Amelia Reed often says, “Vacuum sealing is the closest you can get to freezing a vegetable in a state of suspended animation. You’re not just preserving food; you’re preserving the peak moment of its life.”
What Types of Vacuum Sealers Are There?
Before you run out and buy one, it’s helpful to know the two main players in the game. Think of it like choosing between a trusty sedan and a heavy-duty truck—both get you there, but they’re built for different jobs.
External (or Edge) Vacuum Sealers
This is the most common type you’ll find in home kitchens. They’re typically more compact and affordable. You place the open end of the bag into the machine’s channel, close the lid, and it sucks the air out from the bag itself.
- Best for: Most home gardeners, people with limited counter space, and those on a budget.
- Pros: Affordable, easy to find, small footprint.
- Cons: Can sometimes struggle with very moist foods (liquid can get sucked into the motor), requires special textured bags.
Chamber Vacuum Sealers
These are the workhorses of the vacuum-sealing world, often found in commercial kitchens. Instead of placing the bag’s edge in the machine, you place the entire bag inside a chamber. The machine then removes the air from the entire chamber, which equalizes the pressure inside and outside the bag, before sealing it shut. This unique process means you can seal liquids without any issue.
- Best for: Serious gardeners with massive harvests, people who want to seal soups and stews, or anyone who values durability and performance above all else.
- Pros: Can seal liquids perfectly, uses cheaper, smooth-sided bags, incredibly durable.
- Cons: Much larger, heavier, and significantly more expensive.
For most people starting out, an external sealer is the perfect vacuum sealer for garden vegetables.
How to Use a Vacuum Sealer for Garden Vegetables: Step-by-Step
Alright, let’s get down to business. Sealing your beautiful vegetables isn’t just a matter of “bag it and seal it.” Following these steps will guarantee you get the best possible results.
- Preparation is Everything: Start by washing your vegetables thoroughly. Trim any ends, peel what needs peeling (like carrots or potatoes), and chop everything into the sizes you’ll want to use for cooking later. Think bite-sized pieces for stir-fries or whole green beans for a side dish.
- To Blanch or Not to Blanch? (Crucial Step!): Blanching is the process of briefly boiling your vegetables and then plunging them into an ice bath to stop the cooking process. This is not optional for most vegetables. It deactivates enzymes that would otherwise continue to break down the vegetable’s color, texture, and nutrients, even in the freezer.
- Bring a large pot of water to a rolling boil.
- Add your vegetables and boil for 1-3 minutes (e.g., green beans for 2 mins, broccoli florets for 3 mins).
- Immediately transfer them to a large bowl of ice water to cool completely.
- Dry, Dry, Dry: Moisture is the enemy of a good seal and can contribute to ice crystals. After blanching, lay your vegetables out on a clean kitchen towel or paper towels and pat them as dry as you possibly can. Let them air dry for a bit if needed.
- The Pre-Freeze Flash: This is a pro-tip that makes a world of difference, especially for soft items like sliced tomatoes or bell peppers. Spread the dry, blanched vegetables in a single layer on a baking sheet and pop them in the freezer for 1-2 hours, or until they are firm. This prevents them from being crushed by the vacuum pressure and stops them from clumping together in the bag.
- Bag It Up: Cut a piece from your vacuum sealer roll that’s long enough to hold the vegetables with at least 3-4 inches of extra space at the top. Seal one end to create a bag. Fill the bag with your pre-frozen vegetables, being careful not to overfill it.
- Seal the Deal: Place the open end of the bag into the vacuum channel of your sealer, making sure it’s flat and free of wrinkles or food particles. Close the lid and start the vacuum and seal process. Watch as the machine magically removes the air and creates that perfect, durable seal.
- Label and Store: Use a permanent marker to label the bag with the contents and the date. Trust me, frozen, sealed carrots can look a lot like frozen, sealed sweet potatoes in six months. Store your labeled bags flat in the freezer to save space.
Pro Tips to Get the Most Out of Your Sealer
After sealing hundreds of bags of garden goodies, I’ve picked up a few tricks.
- Double Seal It: For long-term storage or for items with any moisture, run the seal function a second time to create a stronger, more reliable seal just above the first one.
- Mind the Moisture: For wetter vegetables, you can place a folded paper towel inside the bag, just below where the seal will be. It will catch any excess moisture before it gets to the machine’s motor.
- Don’t Overfill Bags: It’s tempting to cram as much as possible into one bag, but this can lead to a poor seal. Leave plenty of headspace.
- Check Your Seals: Before you put a bag in the freezer, give it a gentle squeeze. It should be rock solid and feel like a brick. If it feels soft or squishy, the seal has failed. Cut it open and try again.
|
Our Picks for the Best Food Vacuum Cealer in 2026
As an Amazon Associate, we earn from qualifying purchases.
|
||
| Num | Product | Action |
|---|---|---|
| 1 | FoodSaver V4400 2-in-1 Vacuum Sealer Machine with Automatic Vacuum Sealer Bag Detection and Starter Kit |

|
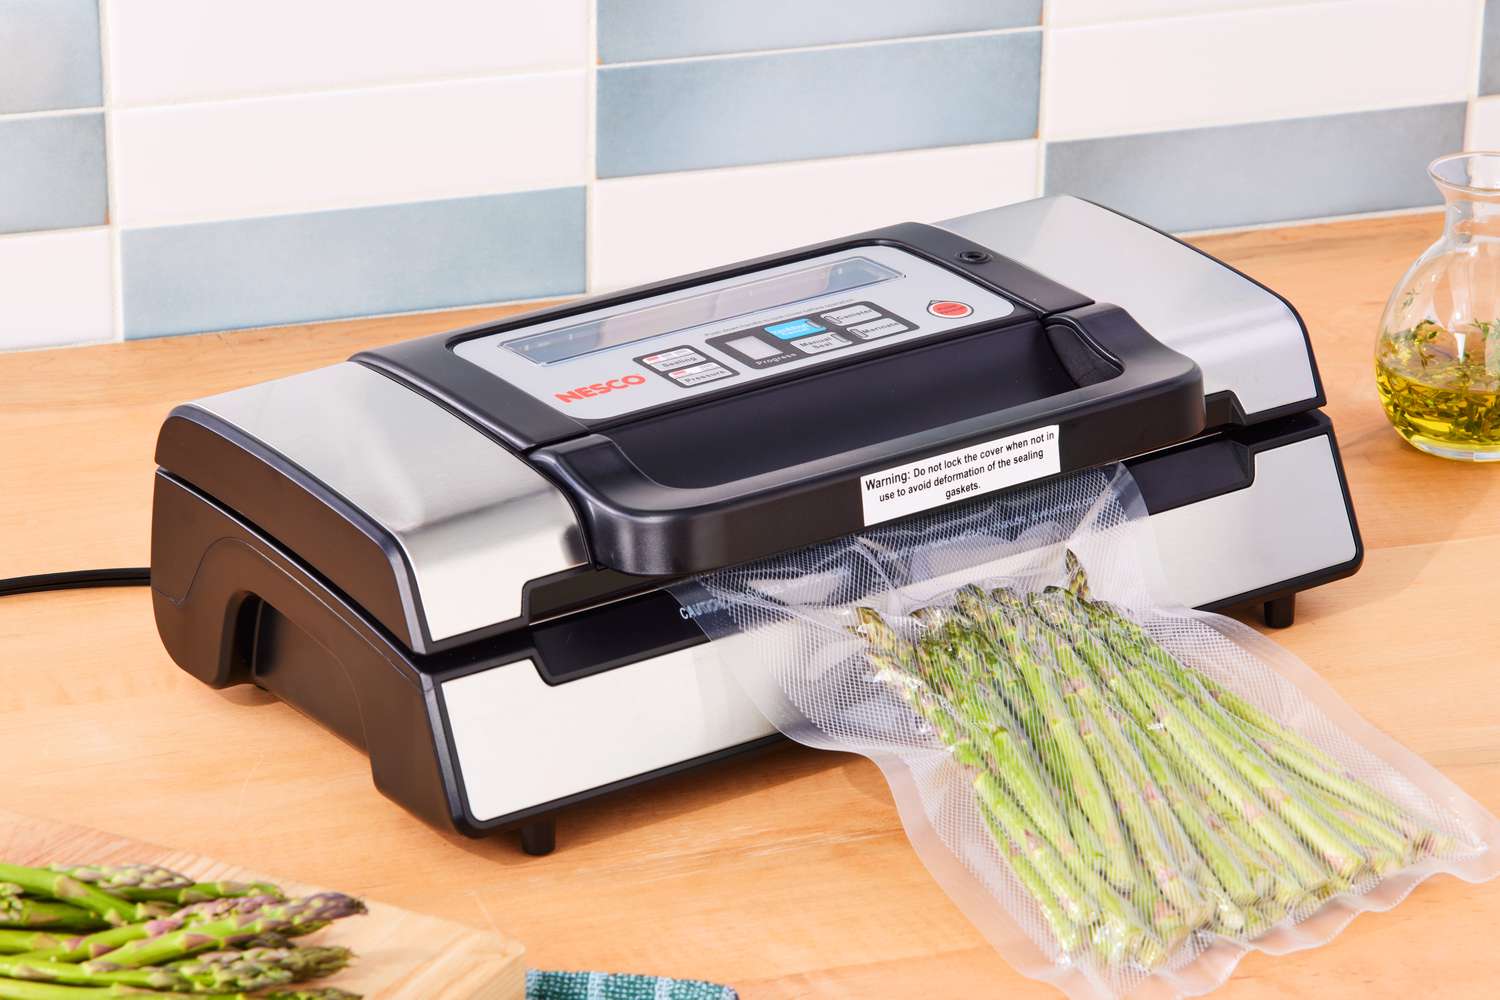
| 2 | Nesco Deluxe Food VS-12 Vacuum Sealer, 130 Watts, Kit Bags & Viewing Lid, Compact, Silver |
|
| 3 |
|
|
| 4 | FoodSaver Compact Vacuum Sealer Machine with Airtight Bags and Roll - Ideal for Sous Vide and Airtight Food Storage, White |
|
| 5 | Vakumar Liquid Vacuum Sealer Machine, 90Kpa Vacuum Sealer Machine Preservation Dry/Moist/Liquid Modes, LED Indicator Light, Handle Locked Design, Built-in Cutter and Bag Storage, Removable Drip Tray |
|
| 6 | FoodSaver Vacuum Sealer Machine, Automatic Bag Detection, Sous Vide Friendly, with sealer bags, roll, handheld vacuum sealer, black |
|
| 7 | Vacuum Sealer Machine Powerful 90Kpa Precision 6-in-1 Compact Food Preservation System with Cutter, 2 Bag Rolls & 5 Pre-cut Bags, Widened 12mm Sealing Strip, Dry&Moist Modes (Silver) |
|
| 8 | Chef Preserve Compact Vacuum Sealer for Food (Vacuum Sealer Machine + 30 Reusable Vacuum Bags) Powerful Handheld Vacuum Sealer Machine, Seal Meal Saver, Portable Food Sealer |
|
| 9 | SEATAO VH5188 Automatic Vacuum Sealer Machine, 90kPa Multifunction Commercial Vacuum Food Sealer For Food Preservation, Dry & Moist & Food & Extended Modes, LED lights, Double Seal |
|
| 10 | NutriChef Automatic Vacuum Air Sealing System for Food Preservation with Starter Kit, Compact Design, Lab Tested, Dry & Moist Food Modes with Led Indicator Lights, Black |
|
What Vegetables Should You Vacuum Seal (and What to Avoid)?
While a vacuum sealer for garden vegetables is incredibly versatile, not all produce is created equal.
Excellent Candidates for Vacuum Sealing (After Blanching)
- Green Beans & Peas: Hold their texture and snap beautifully.
- Broccoli & Cauliflower: Perfect for steaming or roasting later.
- Corn: Both on the cob and kernels freeze wonderfully.
- Carrots, Parsnips, & Root Vegetables: Stay firm and sweet.
- Asparagus: A fantastic way to preserve this spring treat.
- Bell Peppers & Zucchini: Pre-freezing is key here to prevent them from turning to mush.
Vegetables to Avoid or Use Caution With
- Cruciferous Vegetables (Raw): Raw broccoli, cauliflower, cabbage, and Brussels sprouts release gasses as they sit. Even in a vacuum-sealed bag, this gas can cause the bag to expand and spoil the contents. Always blanch these first.
- Mushrooms: Their texture can become quite rubbery. If you must, sauté them first, cool them completely, and then seal.
- Garlic & Onions: Similar to cruciferous veggies, they release gasses and their potent flavor can become overwhelming and unpleasant after long-term frozen storage.
- Soft Greens: Delicate lettuces and salad greens simply don’t have the structure to withstand the vacuum process.
How Do I Choose the Right Vacuum Sealer for My Needs?
Feeling ready to pick one out? Consider these factors to find the perfect match for your garden and kitchen.
- How much are you sealing? If you have a small patio garden, a compact, basic external sealer will do the trick. If you’re processing a half-acre plot, you might want to invest in a more robust, commercial-grade model with a wider seal bar and faster motor.
- What’s your budget? External sealers range from about $50 to $200. Chamber sealers are a bigger investment, starting around $400 and going up into the thousands.
- What features matter to you?
- Pulse Mode: Gives you manual control over the vacuum process, perfect for delicate items like berries or soft breads.
- Wet/Dry Settings: Adjusts the sealing time to ensure a strong seal even if a little moisture is present.
- Built-in Bag Cutter and Storage: Super convenient for custom-sizing your bags from a roll.
- Accessory Port: Allows you to use attachments to seal canisters and jars.
Frequently Asked Questions
Q1: Do I really have to blanch vegetables before vacuum sealing?
Yes, for most vegetables, it’s a non-negotiable step. Blanching stops the enzyme action that degrades the quality of your produce in the freezer. Skipping this step will result in vegetables with poor texture, off-colors, and a less-than-fresh taste.
Q2: How long do vacuum-sealed garden vegetables last in the freezer?
Properly blanched, dried, and vacuum-sealed vegetables can maintain excellent quality for 2 to 3 years. This is a significant improvement over the 6-12 months you’d get with traditional freezer bags or containers.
Q3: Can I vacuum seal delicate vegetables like tomatoes or leafy herbs?
Yes, but with care. For tomatoes, it’s best to slice or dice them, pre-freeze them on a tray, and then seal. For herbs, you can finely chop them, mix with a little olive oil, freeze in an ice cube tray, and then vacuum seal the herb cubes.
Q4: Can I reuse vacuum sealer bags?
You can, but only under certain conditions. If the bag previously held dry goods (like nuts or dried beans), you can wash it thoroughly, dry it completely, and reuse it. Never reuse bags that have held raw meat, fish, or greasy foods. You’ll also need to cut off the old seal, so the bag will get shorter each time.
Q5: What’s the main difference between a cheap and an expensive vacuum sealer?
Generally, more expensive models offer better build quality, stronger vacuum pumps, wider seal bars for a more secure seal, and more features like pulse mode and wet/dry settings. They are built for higher volume and are more likely to stand the test of time.
Your Harvest, Preserved
There is an incredible satisfaction in pulling a bag of your own homegrown green beans from the freezer in January and having them taste as if they were just picked. A vacuum sealer for garden vegetables is more than just a kitchen gadget; it’s a bridge between your seasons of hard work and your year-round enjoyment. It empowers you to reduce waste, save money, and eat healthier. So go ahead, embrace the harvest, and lock in that incredible flavor. Your future self will thank you.