Ever wonder how top chefs get that perfect, edge-to-edge medium-rare steak every single time? The kind that’s so tender it practically melts in your mouth? A big part of their secret is sous vide cooking. But the real unsung hero of that culinary magic is the Vacuum Sealer For Sous Vide Cooking. Without one, you’re essentially trying to swim with a puffy winter coat on—it’s inefficient and you just won’t get the results you’re after. I’ve been in the food preservation game for over a decade, and I can tell you flat out: mastering sous vide starts with mastering the seal.
Think of this as your definitive guide. We’re going to break down exactly why this tool is non-negotiable for serious sous vide enthusiasts, how to use it like a pro, and what to look for when you’re ready to add one to your kitchen arsenal. Let’s get that water bath ready and dive in.
Why is a Vacuum Sealer So Crucial for Sous Vide?
A vacuum sealer is essential for sous vide because it removes air, which is a poor conductor of heat. This ensures direct contact between the food and the bag, allowing the surrounding water bath to transfer heat efficiently and evenly for perfectly consistent cooking results.
It all comes down to a little bit of high school physics. Air is a terrible conductor of heat—in fact, it’s an insulator. When you have air pockets trapped in a bag with your food, those pockets act like tiny shields, preventing the heat from the water bath from reaching the food evenly. This can lead to unevenly cooked spots, longer cooking times, and a less-than-perfect result.
Here’s the breakdown of the key benefits:
- Flawless Heat Transfer: By removing nearly all the air, a vacuum sealer for sous vide cooking ensures the bag is in direct contact with your food. This allows the precisely heated water to cook your steak, chicken, or vegetables with unparalleled consistency. No more guessing games.
- Prevents Floating: Bags with trapped air are buoyant. You’ll spend your time fighting to keep them submerged with clips, weights, or whatever you can find. A properly vacuum-sealed bag sinks and stays put, letting the water circulate freely.
- Better Flavor Infusion: Want to marinate your food? Sealing it in a vacuum with herbs, garlic, or your favorite marinade forces those flavors deep into the protein. The pressure and lack of air create the perfect environment for a rapid, intense flavor infusion.
- Long-Term Storage Solution: The beauty of sous vide is meal prep. You can season and seal several portions of meat or fish, then either cook them right away or toss them in the freezer. They’re perfectly preserved and ready for the water bath whenever you are. This is a game-changer for busy weeknights.
“People often focus on the sous vide circulator, but the sealer is the foundation. A bad seal means a bad cook. It’s the difference between a water-logged piece of fish and a flaky, perfectly cooked fillet.” – Chef Julian Petrov, Culinary Institute of America Alumnus
What are the Main Types of Vacuum Sealers?
When you start shopping, you’ll find two main categories of vacuum sealers. Understanding the difference is key to picking the right one for your sous vide adventures.
External (or Edge) Vacuum Sealers
This is the most common type you’ll find in home kitchens. You place the open end of a specially designed, textured bag into the machine’s channel. The lid closes, the machine sucks the air out through that channel, and then a heat bar seals the bag shut.
- Pros: Generally more affordable, smaller footprint (easier to store), and very easy to use for beginners.
- Cons: Can struggle with sealing very moist foods or liquids (the liquid can get sucked into the vacuum channel), and the special bags can be more expensive over time.
Chamber Vacuum Sealers
These are the workhorses you’ll see in professional kitchens. You place the entire bag inside a chamber. The machine then removes the air from the entire chamber, which equalizes the pressure inside and outside the bag. Because there’s no pressure difference, liquids stay put inside the bag. Once the air is removed, a sealing bar inside the chamber seals the bag.
- Pros: Excellent for sealing liquids like soups, stews, and marinades. Uses smoother, less expensive bags. Generally provides a stronger, more reliable vacuum.
- Cons: Significantly more expensive, much larger and heavier, taking up considerable counter space.
| Feature | External (Edge) Sealer | Chamber Sealer |
|---|---|---|
| Best For | Home cooks, solids, dry goods | Serious enthusiasts, liquids, bulk sealing |
| Price Point | $50 – $250 | $400 – $1,500+ |
| Footprint | Small, easy to store | Large and heavy |
| Bag Type | Textured (more expensive) | Smooth (less expensive) |
| Liquid Sealing | Difficult, requires pre-freezing | Excellent, no special prep needed |
How to Use a Vacuum Sealer for Sous Vide Cooking: A Step-by-Step Guide
Using a vacuum sealer for sous vide cooking is straightforward once you get the hang of it. Here’s my tried-and-true process for a perfect seal every time.
- Prepare Your Food: Pat your protein dry with a paper towel. This is especially important for getting a good sear later. Season it generously with salt, pepper, and any dry rubs. If you’re adding aromatics like garlic cloves or herb sprigs, place them on the food now.
- Choose the Right Bag Size: Select a bag that gives you at least 2-3 inches of extra space at the top. This “headspace” is crucial for getting a clean seal without sucking food or liquid into the machine.
- Place Food in the Bag: Carefully slide your food into the bag, arranging it in a single, flat layer if possible. This ensures even cooking. If you’re sealing something with sharp bones, you might want to wrap the bone tip with a small piece of parchment paper to prevent it from puncturing the bag.
- Position the Bag in the Sealer: Open your sealer and place the open end of the bag flat and wrinkle-free across the sealing bar. Make sure it’s within the designated vacuum channel area, as indicated by your machine’s manual.
- Seal It Up: Close the lid and lock it (if your model requires it). Press the “Vacuum & Seal” button. The machine will whir to life, sucking the air out. You’ll see the bag collapse tightly around your food. Once the vacuum process is complete, the heat bar will activate to create a strong seal.
- Inspect the Seal: Once the machine is done, release the lid and remove your bag. Run your finger along the seal. It should be clear, complete, and free of any wrinkles or gaps. If it looks iffy, it’s always better to be safe than sorry—just make another seal slightly above the first one.
Pro Tips and Tricks for the Best Results
After sealing thousands of bags, I’ve picked up a few tricks. These will take your sous vide game from good to great.
- Double Seal It: For long cooks (24+ hours) or for items going into the freezer, always use the “Seal” function to add a second, parallel seal. It’s a tiny bit of insurance that can prevent a catastrophic bag failure.
- Mastering Liquids: Sealing a wet marinade with an external sealer? Here’s the trick: freeze it first. Pour your marinade into the bag with the protein and place the bag upright in the freezer for an hour or two until the liquid is slushy or solid. Then, seal as normal. The solid liquid won’t get sucked into the motor.
- Cuff the Bag: Before you put your food in, fold the top 2-3 inches of the bag outward to create a cuff. This keeps the sealing area clean from food residue, which can cause a weak seal. Just remember to fold it back before sealing.
- Use the Pulse Function: Many mid-range sealers have a “Pulse” function. This gives you manual control over the vacuum. It’s perfect for delicate items like a piece of flaky fish or soft bread, preventing the machine from crushing them.
|
Our Picks for the Best Food Vacuum Cealer in 2026
As an Amazon Associate, we earn from qualifying purchases.
|
||
| Num | Product | Action |
|---|---|---|
| 1 | Vakumar Liquid Vacuum Sealer Machine, 90Kpa Vacuum Sealer Machine Preservation Dry/Moist/Liquid Modes, LED Indicator Light, Handle Locked Design, Built-in Cutter and Bag Storage, Removable Drip Tray |

|
| 2 | Nesco Deluxe Food VS-12 Vacuum Sealer, 130 Watts, Kit Bags & Viewing Lid, Compact, Silver |
|
| 3 | Vacuum Sealer Machine Powerful 90Kpa Precision 6-in-1 Compact Food Preservation System with Cutter, 2 Bag Rolls & 5 Pre-cut Bags, Widened 12mm Sealing Strip, Dry&Moist Modes (Silver) |
|
| 4 | SEATAO VH5188 Automatic Vacuum Sealer Machine, 90kPa Multifunction Commercial Vacuum Food Sealer For Food Preservation, Dry & Moist & Food & Extended Modes, LED lights, Double Seal |
|
| 5 |
|
|
| 6 | NutriChef Automatic Vacuum Air Sealing System for Food Preservation with Starter Kit, Compact Design, Lab Tested, Dry & Moist Food Modes with Led Indicator Lights, Black |
|
| 7 | Chef Preserve Compact Vacuum Sealer for Food (Vacuum Sealer Machine + 30 Reusable Vacuum Bags) Powerful Handheld Vacuum Sealer Machine, Seal Meal Saver, Portable Food Sealer |
|
| 8 | FoodSaver Vacuum Sealer Machine, Automatic Bag Detection, Sous Vide Friendly, with sealer bags, roll, handheld vacuum sealer, black |
|
| 9 | FoodSaver Compact Vacuum Sealer Machine with Airtight Bags and Roll - Ideal for Sous Vide and Airtight Food Storage, White |
|
| 10 | FoodSaver V4400 2-in-1 Vacuum Sealer Machine with Automatic Vacuum Sealer Bag Detection and Starter Kit |
|
Foods You Should and Shouldn’t Vacuum Seal for Sous Vide
A vacuum sealer is incredibly versatile, but not everything is a great candidate for it, especially when sous vide is involved.
Excellent Foods for Sealing:
- Proteins: Steak, pork chops, chicken breasts, lamb, and fish fillets are ideal.
- Tough Cuts: Brisket, short ribs, and pork shoulder become incredibly tender with long sous vide cooks.
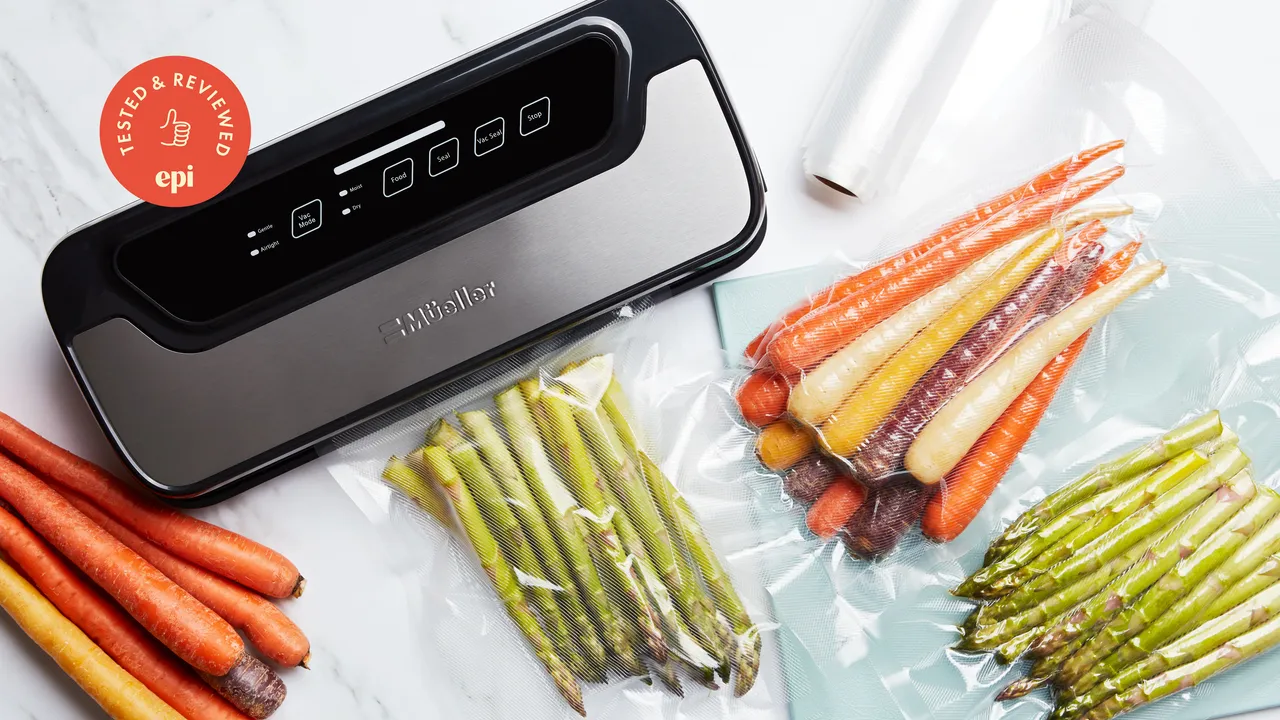
- Vegetables: Root vegetables like carrots and potatoes, as well as asparagus and broccoli, cook beautifully and retain their nutrients.
- Eggs: For custards, crème brûlée, or perfectly poached-style eggs.
- Infusions: You can infuse oils with herbs or make cocktail syrups.
Foods to Be Cautious With:
- Cruciferous Vegetables: Vegetables like broccoli, cabbage, and Brussels sprouts can release gases as they cook, which can cause the bag to inflate. It’s best to blanch them quickly before sealing.
- Soft Cheeses: The pressure can crush delicate cheeses. Use the pulse function if you must seal them.
- Mushrooms: Raw mushrooms can have an odd texture when vacuum sealed and cooked sous vide. It’s often better to sear them first.
- Raw Garlic: Under anaerobic (no oxygen) and low-temperature conditions, there is a very small but present risk of botulism spores growing from raw garlic. While the risk is minimal at proper sous vide temperatures, many chefs prefer to use garlic powder or lightly sauté the garlic first to be extra safe.
How to Choose the Right Vacuum Sealer for Sous Vide
Choosing the right machine depends on your cooking habits, kitchen space, and budget. Ask yourself these questions to find the perfect fit.
The best way to choose a vacuum sealer for sous vide cooking is to assess your needs. For occasional use with solid foods, a reliable external sealer is perfect. If you plan to seal liquids, cook in large batches, or want professional-grade performance, investing in a chamber sealer is worthwhile.
Consider these factors:
- Frequency of Use: If you’re a sous vide fanatic, invest in a durable model with a good motor that won’t overheat.
- Types of Food: Are you mostly sealing steaks, or do you plan on sealing soups and marinades? This is the primary deciding factor between an external and a chamber model.
- Features: Look for helpful features like a wet/dry mode, a pulse setting, a built-in bag cutter, and bag roll storage.
- Your Budget: You can get a solid entry-level model for under $100. High-end external sealers run up to $300, and chamber sealers start around $400. Remember to factor in the ongoing cost of bags.
Frequently Asked Questions
Can I sous vide without a vacuum sealer?
Yes, you can use the water displacement method (Ziploc bag method). You place food in a freezer-safe zip-top bag, slowly lowering it into the water, which forces the air out before you seal it. However, it’s less reliable, the seals can fail, and it’s nearly impossible to get as much air out as a proper vacuum sealer for sous vide cooking.
Are vacuum sealer bags safe for sous vide?
Absolutely, as long as they are specifically rated for it. Look for bags that are BPA-free and designed to withstand boiling temperatures for extended periods. Most reputable brands clearly state their bags are sous vide safe.
Can I reuse sous vide vacuum sealer bags?
You can, but only with caution. If the bag held raw meat, poultry, or fish, it’s not recommended due to the risk of cross-contamination. If it held vegetables, you can wash it thoroughly in hot, soapy water and reuse it, but the seal will be less reliable each time.
How powerful of a vacuum sealer do I need?
For sous vide, the strength of the vacuum (measured in inches of mercury, or “Hg) is important but not the only factor. A strong seal is more critical. Most quality home models provide more than enough vacuum power for sous vide applications. Focus more on build quality and features relevant to you.
What’s the difference between a dry and a moist food setting?
The dry setting is for foods with low moisture content and runs a full vacuum cycle. The moist setting anticipates that some liquid might be drawn toward the sealer; it automatically extends the heat-sealing time to ensure a strong seal even if a small amount of moisture is present on the bag’s inner surface.
Your Journey to Sous Vide Perfection Starts Here
Getting into sous vide cooking is an exciting step toward achieving restaurant-quality results at home. While the circulator gets all the attention, it’s the humble vacuum sealer for sous vide cooking that does the critical prep work. It ensures efficiency, enhances flavor, and provides the consistency that is the hallmark of this cooking method.
By choosing the right machine for your needs and mastering a few simple techniques, you’ll unlock a new level of control and creativity in your kitchen. So go ahead, get sealing, and prepare to be amazed at the delicious results.