Let’s be real for a moment. You’ve seen those perfectly portioned, freezer-burn-free chicken breasts in your friend’s freezer, and you’ve heard the whispers about food staying fresh for weeks, not days. The magic behind it? A vacuum sealer. But then you see the price tags on some models and think, “Is this really for me?” I’m here to tell you that you don’t need to drop a couple of hundred dollars to join the food-saving revolution. Finding the Best Vacuum Sealer Under 50 is not only possible, but it’s also a game-changer for your kitchen and your wallet. The trick is knowing what to look for and how to separate the genuine bargains from the countertop clutter. So, grab a cup of coffee, and let’s dive into how you can stop throwing away food and start saving serious money.
What Exactly Does a Vacuum Sealer Do?
A vacuum sealer is a kitchen appliance that removes air from a specially designed bag or container and then uses a heated strip to create an airtight seal. By removing most of the oxygen, it dramatically slows down the process of spoilage. Oxygen is the fuel for mold, mildew, and bacteria. Take it away, and you essentially hit the pause button on your food’s expiration date. This simple process is your number one weapon against freezer burn and keeps food fresh up to five times longer than traditional storage methods like zipper bags or plastic wrap.
Why a Budget-Friendly Vacuum Sealer is a Smart Choice
Are you wondering if a model in this price range can actually get the job done? The answer is a resounding yes, especially for home use. While a professional chef might need a heavy-duty chamber sealer, for the average family looking to preserve weekly groceries, leftovers, or bulk food purchases, an affordable sealer is the perfect entry point. The best vacuum sealer under 50 will provide the core functionality you need—strong suction and a reliable seal—without the bells and whistles that drive up the cost. Think of it as the difference between a reliable sedan and a luxury sports car; both get you where you need to go, but one is much more practical for daily life.
Key Features to Look for in the Best Vacuum Sealer Under 50
When you’re shopping on a budget, every feature counts. Don’t get distracted by flashy lights or a dozen buttons. Focus on these core elements to ensure you’re getting a machine that performs well and will last.
Suction Power: The Heart of the Machine
Suction is what removes the air. While budget models won’t compete with their pricier cousins, you still need enough power to create a tight vacuum. Look for models with consistently positive user reviews mentioning strong suction. A good indicator is its ability to handle both dry and moist foods, even if it requires a little technique (more on that later!). A machine with weak suction is little more than a bag sealer, and you’ll be disappointed with the results.
Sealing Strip: The Gatekeeper of Freshness
The part that melts the bag shut is the sealing strip. A quality strip creates a wide, consistent seal that won’t leak or fail in the freezer. Look for a sealer that creates at least a 2-3mm wide seal. Some budget models even offer a “double seal” feature, which is a fantastic bonus for ensuring long-term storage, especially for liquids or moist foods.
Ease of Use and Compact Design
Your new gadget shouldn’t require an engineering degree to operate. The best entry-level models are intuitive, often featuring one-touch operation for “Vacuum & Seal.” Also, consider its footprint. Kitchen counter space is prime real estate! A compact, lightweight model is easier to store in a cabinet or drawer when not in use, making it a much more convenient tool.
What’s Included? The Starter Kit Matters
Check the box! Many affordable vacuum sealers come with a starter set of bags. This is a huge plus because it lets you start sealing right out of the box without an immediate second purchase. Having a small roll or a few pre-cut bags of different sizes is perfect for getting a feel for the machine.
|
Our Picks for the Best Food Vacuum Cealer in 2026
As an Amazon Associate, we earn from qualifying purchases.
|
||
| Num | Product | Action |
|---|---|---|
| 1 | FoodSaver V4400 2-in-1 Vacuum Sealer Machine with Automatic Vacuum Sealer Bag Detection and Starter Kit |

|
| 2 | NutriChef Automatic Vacuum Air Sealing System for Food Preservation with Starter Kit, Compact Design, Lab Tested, Dry & Moist Food Modes with Led Indicator Lights, Black |
|
| 3 | Chef Preserve Compact Vacuum Sealer for Food (Vacuum Sealer Machine + 30 Reusable Vacuum Bags) Powerful Handheld Vacuum Sealer Machine, Seal Meal Saver, Portable Food Sealer |
|
| 4 |
|
|
| 5 | Vakumar Liquid Vacuum Sealer Machine, 90Kpa Vacuum Sealer Machine Preservation Dry/Moist/Liquid Modes, LED Indicator Light, Handle Locked Design, Built-in Cutter and Bag Storage, Removable Drip Tray |
|
| 6 | FoodSaver Compact Vacuum Sealer Machine with Airtight Bags and Roll - Ideal for Sous Vide and Airtight Food Storage, White |
|
| 7 | Nesco Deluxe Food VS-12 Vacuum Sealer, 130 Watts, Kit Bags & Viewing Lid, Compact, Silver |
|
| 8 | SEATAO VH5188 Automatic Vacuum Sealer Machine, 90kPa Multifunction Commercial Vacuum Food Sealer For Food Preservation, Dry & Moist & Food & Extended Modes, LED lights, Double Seal |
|
| 9 | Vacuum Sealer Machine Powerful 90Kpa Precision 6-in-1 Compact Food Preservation System with Cutter, 2 Bag Rolls & 5 Pre-cut Bags, Widened 12mm Sealing Strip, Dry&Moist Modes (Silver) |
|
| 10 | FoodSaver Vacuum Sealer Machine, Automatic Bag Detection, Sous Vide Friendly, with sealer bags, roll, handheld vacuum sealer, black |
|
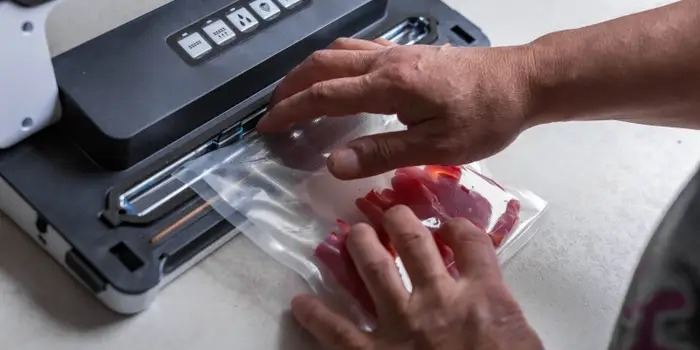
A Step-by-Step Guide: Your First Sealing Session
Ready to give it a whirl? Using your new vacuum sealer is incredibly simple. Here’s a breakdown to ensure your first time is a success.
- Prep Your Food: Make sure your food is cool and dry if possible. For liquids like soups or stews, pre-freeze them in a container for a few hours until solid.
- Choose the Right Bag: Use a bag that’s a few inches longer than the food item to leave enough space for the sealer to work its magic. Place the food inside.
- Position the Bag: Open the lid of your sealer and place the open end of the bag into the vacuum channel, making sure it’s flat and wrinkle-free.
- Lock and Seal: Close the lid firmly, ensuring it latches on both sides (you’ll usually hear a “click”). Press the “Vacuum & Seal” button.
- Watch the Magic Happen: The machine will suck the air out, and you’ll see the bag shrink tightly around your food. Once the vacuum process is complete, the sealing light will illuminate as the machine seals the bag. It will turn off when it’s done.
- Release and Inspect: Unlock the lid, remove your perfectly sealed package, and check the seal to ensure it’s complete and clear.
- Label and Store: Always label your bags with the contents and the date before storing them in the pantry, fridge, or freezer. Trust me, “mystery meat” from six months ago is no fun.
Pro Tips for Sealing Like a Seasoned Chef
After using vacuum sealers for years, I’ve picked up a few tricks that make a huge difference, especially with budget-friendly models.
- The Paper Towel Trick: When sealing moist foods like meat or fish, fold a small paper towel and place it inside the bag, just below where the seal will be. It will absorb any excess liquid that gets pulled up, ensuring a clean, dry surface for a perfect seal.
- Double Up: If you’re sealing something for long-term freezer storage or for sous vide cooking, run the seal function a second time to create a double seal. It’s an extra layer of security.
- Don’t Overfill: This is the most common rookie mistake. Leave at least 3 inches of empty space at the top of the bag. The sealer needs this room to pull a vacuum and create a strong seal.
- Flash Freeze Berries: To prevent delicate items like berries or bread from being crushed, spread them on a baking sheet and “flash freeze” them for an hour before sealing.
Foods You Should and Shouldn’t Vacuum Seal
While a vacuum sealer is incredibly versatile, it’s not suitable for everything. Knowing the difference is key to food safety and quality.
Great Candidates for Vacuum Sealing
- Meats and Poultry: Whole cuts, ground meat, and chicken pieces.
- Fish: Both raw fillets and smoked fish.
- Hard Cheeses: Prevents mold and keeps them from drying out.
- Dry Goods: Coffee beans, pasta, rice, and nuts. Keeps them from going stale.
- Pre-Cooked Meals: Perfect for meal prep and quick weeknight dinners.
- Vegetables and Fruits: Especially for freezing to prevent freezer burn.
Foods to Be Cautious With
- Cruciferous Vegetables: Raw broccoli, cauliflower, cabbage, and Brussels sprouts emit gases as they ripen. These gases can cause the bag to expand and spoil the food. You must blanch them first before vacuum sealing and freezing. You can find more details in [our complete guide to blanching vegetables].
- Soft Cheeses: Cheeses like brie or ricotta don’t do well, as the process can crush them and alter their texture.
- Garlic and Onions: Raw garlic and onions have a risk of promoting the growth of anaerobic bacteria (bacteria that thrive without oxygen), like botulism, when stored at room temperature. It’s safest to only seal and freeze them.
As Dr. Elena Vance, a leading food preservation scientist, often states: “Vacuum sealing is a powerful tool, but it doesn’t make food immortal. It works by removing oxygen to inhibit certain types of spoilage. Always follow proper food safety guidelines, especially with low-acid foods like garlic and vegetables, by blanching and freezing.”
Frequently Asked Questions About Budget Vacuum Sealers
Can I use any brand of bags with a cheap vacuum sealer?
For the most part, yes. Most external clamp-style sealers (which is what you’ll find in this price range) are compatible with any textured or embossed vacuum sealer bags or rolls. Smooth bags will not work, as they don’t allow air to be pulled out.
How long will my food last with a vacuum sealer under $50?
When stored properly in the freezer, vacuum-sealed food can last for 2-3 years, compared to just 6-12 months with traditional methods. In the fridge, it can extend the life of meats and cheeses by weeks. The effectiveness of the seal is the most important factor, which is why choosing a reliable model is key.
What’s the main difference between a $50 and a $150 vacuum sealer?
The primary differences are usually suction power, build quality, and extra features. More expensive models often have faster vacuum motors, built-in bag roll storage and cutters, and advanced settings for moist foods or marinating. For basic preservation, a quality budget model is more than sufficient.
Is a vacuum sealer under 50 good enough for sous vide cooking?
Absolutely! A strong, reliable seal is the most important thing for sous vide, and many budget models can deliver just that. Just be sure to create a good, wide seal (and maybe a double seal) to ensure the bag doesn’t leak in the water bath. Check out [our beginner’s guide to sous vide] for more tips.
How do I clean my budget vacuum sealer?
Cleaning is simple. After use, unplug the machine and wipe down the vacuum channel and sealing strip with a damp cloth to remove any food residue or moisture. Let it dry completely before storing. Most have a removable drip tray that can be washed with warm, soapy water.
Your Journey to a Fresher Kitchen Starts Here
Jumping into the world of vacuum sealing doesn’t have to be an expensive endeavor. It’s a practical investment that pays for itself in just a few months through reduced food waste and the ability to buy in bulk. By focusing on the core functions of suction power and a reliable seal, you can easily find a fantastic machine that will become an indispensable tool in your kitchen. So go ahead, start saving money, and enjoy the taste of fresh food for longer. With the right information, you can confidently find the best vacuum sealer under 50 to fit your needs and revolutionize the way you store food.