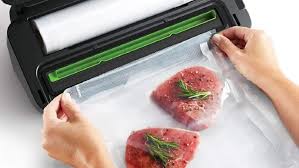
You’ve just finished a marathon meal-prepping session. The counters are filled with perfectly portioned chicken breasts, vibrant veggies, and maybe even some marinated steaks, all sealed up and ready for the freezer. Your vacuum sealer has worked its magic, and you’re feeling accomplished. But wait, what about the machine itself? Knowing exactly How To Clean Vacuum Sealer After Use is one of the most overlooked yet crucial steps in food preservation. It’s the difference between a machine that lasts for years and one that gives up the ghost too soon, not to mention a cornerstone of kitchen hygiene. Let’s roll up our sleeves and get that sealer sparkling clean and ready for its next mission.
Proper cleaning is more than just a chore; it’s an investment in your health and your appliance. To better understand its importance, it’s helpful to consider the principles of how to extend vacuum sealer lifespan, as regular maintenance is a huge part of that equation.
Why Bother Cleaning Your Vacuum Sealer?
Is a quick wipe-down really that important? Absolutely. Think about it: your vacuum sealer comes into direct contact with raw meat, poultry, and fish juices. Neglecting to clean it is like using the same cutting board for raw chicken and then salad without washing it. It’s a recipe for disaster.
Here’s the breakdown of why this simple task is a non-negotiable:
- Preventing Cross-Contamination: This is the big one. Bacteria from raw foods, like Salmonella or E. coli, can linger in the machine’s nooks and crannies. If you then seal a block of cheese or some fresh fruit, you could be transferring those harmful germs.
- Ensuring a Perfect Seal: Tiny food particles, grease, or moisture left on the sealing strip or gaskets can compromise the quality of the seal. A weak seal means air can creep back in, leading to freezer burn and spoiled food—the very things you’re trying to prevent.
- Extending Your Machine’s Lifespan: Gunk and grime can degrade the soft rubber gaskets and clog the vacuum channel over time. A clean machine is a happy, efficient machine that will serve you well for years to come.
- Eliminating Nasty Odors: Old food residue, especially from things like fish or garlic, can leave behind funky smells that transfer to other foods.
What You’ll Need: Your Cleaning Toolkit
The good news is you don’t need any fancy or expensive equipment. You probably have everything you need right in your kitchen.
- A soft, damp cloth or sponge
- Warm, soapy water (mild dish soap is perfect)
- A soft-bristled brush (an old toothbrush works wonders)
- Paper towels or a dry, clean cloth
- Optional: A solution of equal parts water and white vinegar for extra sanitizing power.
Expert Tip: Dr. Amelia Thorne, a food safety consultant, often says, “Treat your vacuum sealer’s drip tray with the same caution you’d use for a raw meat cutting board. It’s a potential hotspot for bacteria, and diligent cleaning is your best defense against foodborne illness.”
The Step-by-Step Guide: How to Clean Vacuum Sealer After Use
Alright, let’s get down to the nitty-gritty. This process should take you less than five minutes, and it’s worth every second.
- Safety First: Unplug the Machine!
Before you do anything else, disconnect your vacuum sealer from the power outlet. Never attempt to clean an electronic appliance while it’s plugged in. It’s a simple step, but it’s the most important one. - Wipe Down the Exterior
Take your damp, soft cloth and give the entire outside of the unit a good wipe. This removes any fingerprints, dust, or food splatters that might have occurred during the sealing process. - Focus on the Drip Tray
This is where any excess liquid gets sucked up during the sealing process. Most modern vacuum sealers have a removable drip tray for this very reason.- Carefully take it out.
- Wash it thoroughly in your sink with warm, soapy water.
- For stubborn, dried-on messes, let it soak for a few minutes before scrubbing.
- Rinse it completely and make sure it’s 100% dry before putting it back. Many are top-rack dishwasher safe, but always check your user manual first.
- Clean the Vacuum Chamber and Gaskets
The vacuum chamber is the indented area where the magic happens. It’s surrounded by soft foam or rubber gaskets that create the airtight seal.- Use your damp cloth (with a little soap if needed) to wipe the inside of the chamber clean.
- Pay close attention to the gaskets. Gently wipe them down to remove any food residue. Be careful not to use abrasive cleaners or scrub too hard, as you could damage them.
- Use your soft-bristled brush or a cotton swab to get into any tight corners or grooves.
- Inspect the Sealing Strip
The sealing strip is the heated element that melts the plastic bag to create the seal. It should be free of any debris. A tiny piece of food stuck here can cause the seal to fail. Gently wipe it with a soft cloth. Never use anything sharp to scrape it clean. - Dry Everything Thoroughly
Moisture is the enemy. Before you reassemble your sealer or put it away, make sure every single part is completely dry. Use paper towels or a clean, dry cloth. You can also let the parts air-dry on a rack. - Reassemble and Store
Once everything is clean and bone-dry, put the drip tray back in place. Now your sealer is ready for its next use. Proper cleaning and storage go hand-in-hand. For those looking to maximize their appliance’s longevity, learning how to store vacuum sealer safely is the logical next step to mastering its care.
|
Our Picks for the Best Food Vacuum Cealer in 2026
As an Amazon Associate, we earn from qualifying purchases.
|
||
| Num | Product | Action |
|---|---|---|
| 1 | Nesco Deluxe Food VS-12 Vacuum Sealer, 130 Watts, Kit Bags & Viewing Lid, Compact, Silver |

|
| 2 | FoodSaver V4400 2-in-1 Vacuum Sealer Machine with Automatic Vacuum Sealer Bag Detection and Starter Kit |
|
| 3 |
|
|
| 4 | FoodSaver Vacuum Sealer Machine, Automatic Bag Detection, Sous Vide Friendly, with sealer bags, roll, handheld vacuum sealer, black |
|
| 5 | Chef Preserve Compact Vacuum Sealer for Food (Vacuum Sealer Machine + 30 Reusable Vacuum Bags) Powerful Handheld Vacuum Sealer Machine, Seal Meal Saver, Portable Food Sealer |
|
| 6 | Vakumar Liquid Vacuum Sealer Machine, 90Kpa Vacuum Sealer Machine Preservation Dry/Moist/Liquid Modes, LED Indicator Light, Handle Locked Design, Built-in Cutter and Bag Storage, Removable Drip Tray |
|
| 7 | SEATAO VH5188 Automatic Vacuum Sealer Machine, 90kPa Multifunction Commercial Vacuum Food Sealer For Food Preservation, Dry & Moist & Food & Extended Modes, LED lights, Double Seal |
|
| 8 | NutriChef Automatic Vacuum Air Sealing System for Food Preservation with Starter Kit, Compact Design, Lab Tested, Dry & Moist Food Modes with Led Indicator Lights, Black |
|
| 9 | FoodSaver Compact Vacuum Sealer Machine with Airtight Bags and Roll - Ideal for Sous Vide and Airtight Food Storage, White |
|
| 10 | Vacuum Sealer Machine Powerful 90Kpa Precision 6-in-1 Compact Food Preservation System with Cutter, 2 Bag Rolls & 5 Pre-cut Bags, Widened 12mm Sealing Strip, Dry&Moist Modes (Silver) |
|
How Often Should You Clean Your Sealer?
The short answer is: after every single use. Think of it like washing a knife or a pan. If it touched food, it needs to be cleaned. A quick wipe-down after sealing dry goods like nuts or grains is sufficient. However, if you’ve sealed anything moist or greasy—especially raw meat, fish, or marinated items—a full, thorough cleaning using the steps above is essential.
For those who use their sealer frequently, considering greener cleaning options can be beneficial. There are many effective, non-toxic methods available, and you can explore some of these in our guide to eco friendly vacuum sealer cleaning tips for a more sustainable kitchen routine.
Common Cleaning Mistakes to Avoid
Even with the best intentions, it’s easy to make a few mistakes. Here are some common pitfalls to watch out for:
- Submerging the Unit in Water: This is a huge no. Your vacuum sealer is an electrical appliance. Never put the main body of the unit in the sink or dishwasher. This will cause irreparable damage and is a serious safety hazard.
- Using Harsh Chemicals or Abrasive Scrubbers: Bleach, ammonia-based cleaners, or scouring pads can damage the plastic housing, scratch the surfaces, and degrade the soft gaskets that are critical for a proper seal. Stick to mild soap and water.
- Forgetting to Dry It Completely: Putting away a damp sealer can lead to mold and mildew growth, creating unpleasant odors and potential health risks.
- Scraping the Sealing Strip: Using a knife or metal tool to remove burnt-on residue from the heat strip will almost certainly damage it, leading to poor or failed seals.
Frequently Asked Questions (FAQ)
Q1: Can I put my vacuum sealer’s drip tray in the dishwasher?
Many modern drip trays are designed to be top-rack dishwasher safe for easy cleaning. However, you should always consult your specific model’s user manual to be certain, as some plastics can warp under high heat.
Q2: What should I do if my vacuum sealer has a bad smell?
A persistent bad odor usually means there’s old food residue trapped somewhere. Perform a deep clean, paying extra attention to the gaskets and vacuum channel. Wiping the chamber with a solution of half water, half white vinegar can help neutralize tough odors. Let it air out completely before closing the lid.
Q3: How do I clean the foam gaskets?
Gently wipe the foam gaskets with a damp cloth. Avoid soaking them or using harsh soap, as this can cause them to break down or lose their shape. If they are removable, you can wash them gently by hand with mild soap, rinse thoroughly, and allow them to air dry completely before reinserting.
Q4: Is it necessary to clean the sealer after sealing dry goods like flour or coffee beans?
Yes, it’s still a good practice. Fine powders can get into the vacuum channel and affect the pump’s performance over time. A quick, dry wipe-down is usually sufficient to remove any dust or particles after sealing dry items.
Q5: My sealer isn’t sealing properly after I cleaned it. What did I do wrong?
First, check that the gaskets are seated correctly and aren’t twisted or damaged. Second, ensure the drip tray is fully inserted and the lid can close properly. Finally, make sure the sealing strip and the area of the bag you’re sealing are both completely clean and dry. Any moisture or debris can interfere with the heat seal.
A Clean Sealer is a Better Sealer
Mastering how to clean vacuum sealer after use isn’t just about tidiness; it’s about ensuring food safety, maximizing the freshness of your food, and protecting your investment. By turning this simple, five-minute routine into a habit, you guarantee that your trusted kitchen gadget will perform at its best every single time. So next time you finish sealing up your delicious finds, give your machine a little TLC. Your future self—and your taste buds—will thank you.