Ever wonder how chefs get that steak so perfectly pink from edge to edge? The secret often lies in a powerful duo: sous vide and vacuum sealing. While the sous vide machine handles the precision cooking, the magic really begins with the prep. Learning How To Vacuum Seal For Sous Vide Cooking is not just a preliminary step; it’s the foundation for incredible flavor, texture, and consistency. It’s the difference between a good meal and a truly unforgettable one. Forget the guesswork—we’re about to dive deep into the simple techniques that will elevate your home cooking to professional levels.
Why Vacuum Sealing is a Game-Changer for Sous Vide
So, what’s the big deal? Why can’t you just use a regular zip-top bag? While the water displacement method (using water pressure to push air out of a bag) is a decent start, vacuum sealing is in a league of its own.
A vacuum sealer works by removing virtually all the air from a specialized bag before creating an airtight, heat-sealed closure. This simple action has profound effects on your sous vide results.
- Flawless Heat Transfer: Air is a terrible conductor of heat. By removing it, you ensure the food makes direct contact with the bag, which in turn makes direct contact with the heated water. This means no “cold spots” and a perfectly even cook every single time. Think of it like a tailored suit versus a baggy jacket—one fits perfectly, transferring warmth efficiently, while the other leaves pockets of cold air.
- Intensified Flavor Infusion: When you seal herbs, marinades, or aromatics in an anaerobic (oxygen-free) environment with your protein or vegetables, there’s nowhere for those flavors to go but into the food. The marinade doesn’t get diluted by the water bath, resulting in a much deeper, richer taste profile.
- Prevents Floating: This is a classic rookie mistake. Bags with trapped air are buoyant, causing them to float to the surface of the water bath. This leads to uneven and unsafe cooking. A properly vacuum-sealed bag sinks and stays submerged, guaranteeing a consistent and safe result.
- Long-Term Storage and Meal Prep: Vacuum sealing is a fantastic preservation method. You can season and seal portions of meat or vegetables, toss them in the freezer, and they’re ready to go straight from the freezer into the sous vide bath on a busy weeknight.
What Are the Best Types of Sealers for Sous Vide?
What kind of vacuum sealer should you use? The best type depends on your needs, but the two main players are external sealers and chamber sealers. Both are excellent for preparing food for the water bath.
External Vacuum Sealers
These are the most common type found in home kitchens. You place the open end of a textured bag into the machine’s sealing bar, close the lid, and the machine sucks the air out before sealing the edge.
- Pros: Affordable, compact, and easy to store. Perfect for most solids like steaks, chicken breasts, and firm vegetables.
- Cons: They can struggle with liquids. The suction can pull moisture into the machine, leading to a weak seal or even damage.
Chamber Vacuum Sealers
Chamber sealers are the workhorses of professional kitchens. You place the entire bag inside a chamber, and the machine removes the air from the entire chamber before sealing the bag. This pressure equalization means liquids stay put.
- Pros: Can seal liquids and moisture-rich foods (soups, stews, marinades) perfectly. Provides a stronger, more reliable vacuum.
- Cons: Much larger, heavier, and significantly more expensive.
For most home cooks starting out, an external vacuum sealer is more than capable and a fantastic investment.
How to Vacuum Seal for Sous Vide Cooking: Your Step-by-Step Guide
Ready to get sealing? The process is straightforward, but paying attention to the details will ensure a perfect seal every time.
- Prepare Your Food: Pat your protein dry with a paper towel. A dry surface helps achieve a better sear later. Season it generously with salt, pepper, herbs, or your favorite dry rub. If using a marinade, use just enough to coat the food without creating excess liquid.
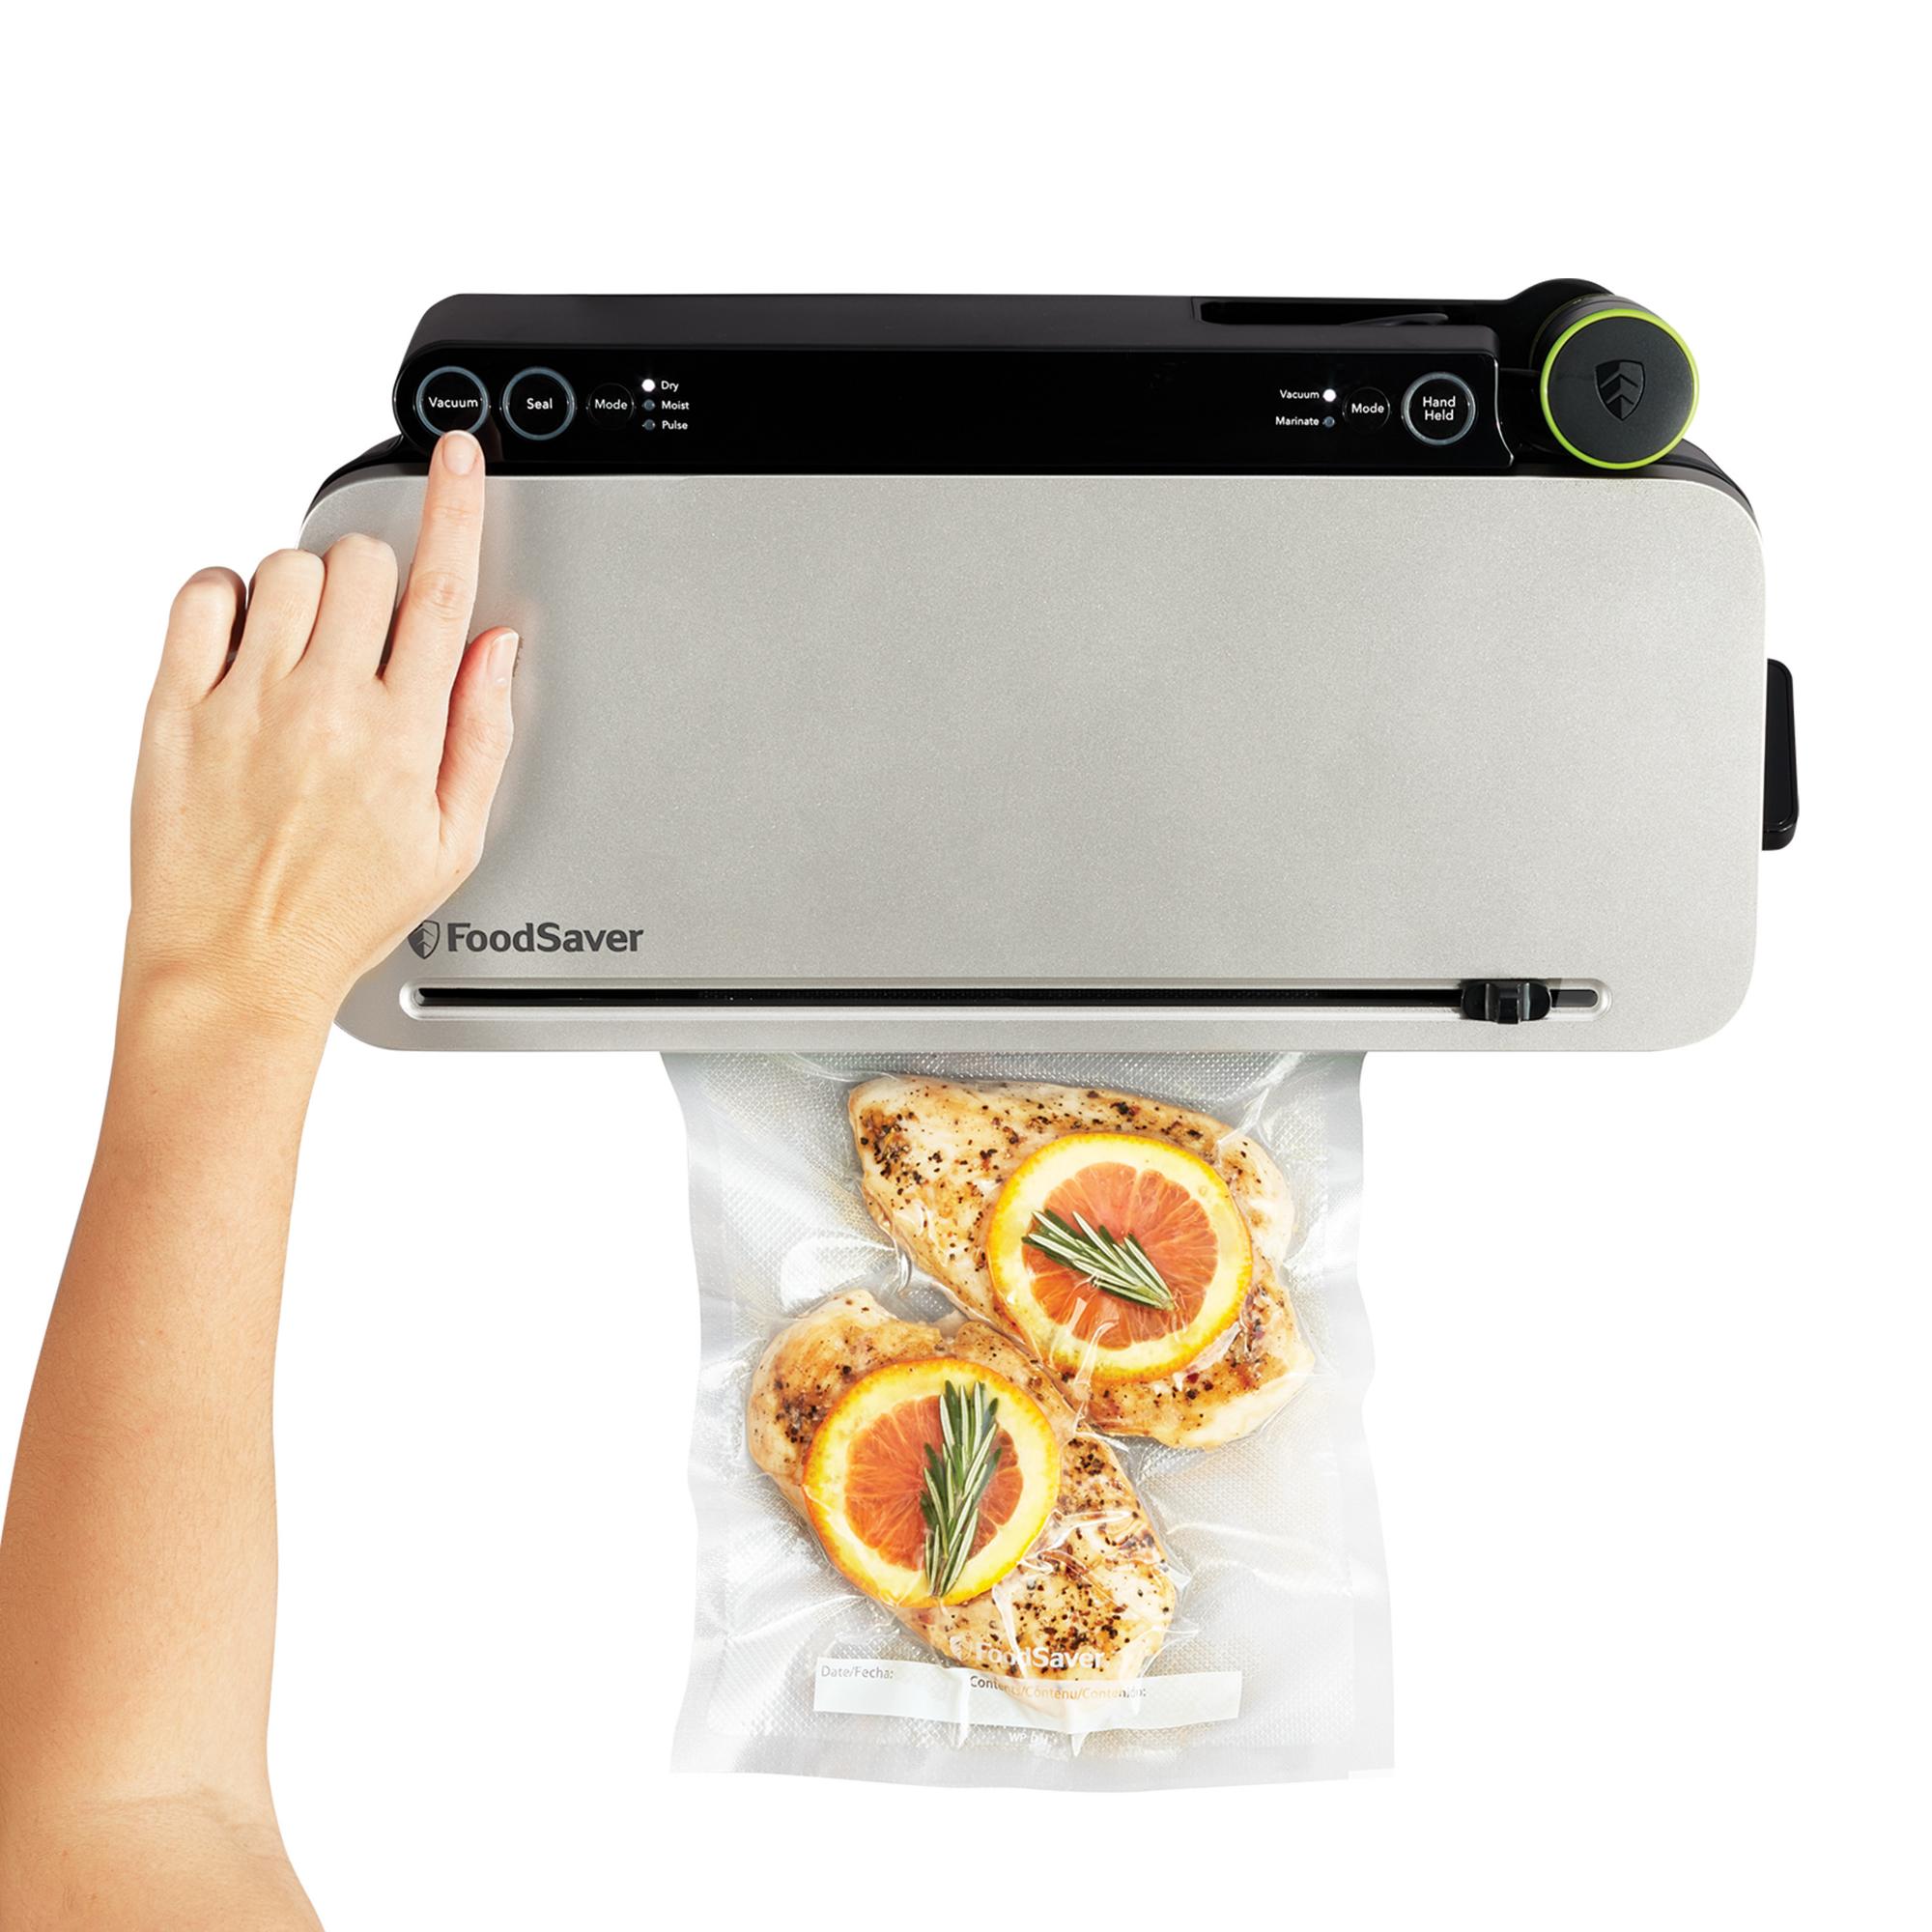
- Choose the Right Bag: Use bags specifically designed for vacuum sealing and sous vide. They are BPA-free and built to withstand prolonged cooking temperatures. Cut a piece from a roll that’s at least 4-5 inches longer than the food to ensure you have enough room for a solid seal.
- Place Food in the Bag: Gently slide your seasoned food into the bag, arranging it in a single, flat layer. Don’t overcrowd the bag. If you have multiple items, like two chicken breasts, ensure they aren’t overlapping.
- Position the Bag in the Sealer: Open your vacuum sealer and place the open end of the bag squarely across the sealing strip. Make sure the bag is flat and has no wrinkles in the area that will be sealed. Most machines have guide markings to help you.
- Vacuum and Seal: Close the lid and lock it according to your machine’s instructions. Press the “Vacuum & Seal” button. The machine will whir to life, sucking the air out. You’ll see the bag shrink tightly around the food. Once the vacuum process is complete, the machine will automatically engage its heat bar to seal the bag.
- Inspect the Seal: Once the cycle is finished, release the lid and remove your bag. Run your finger along the seal. It should be clear, flat, and have no gaps or wrinkles. For extra security, especially for long cooks, it’s a great idea to create a second seal about a quarter-inch away from the first one.
And that’s it! Your food is now perfectly prepped and ready for its sous vide water bath.
Pro Tips for Perfect Sous Vide Vacuum Sealing Every Time
After sealing hundreds of bags, I’ve learned a few tricks that make a huge difference. Avoid common frustrations with these insider tips.
- Cuff the Bag: Before placing food inside, fold the top two inches of the bag outwards to create a cuff. This prevents any food juices or seasoning particles from contaminating the sealing area, which is a primary cause of seal failure.
- The Double Seal is Your Best Friend: I can’t stress this enough. Always perform a double seal. It takes an extra 10 seconds and provides peace of mind, especially for cooks that last 24, 48, or even 72 hours.
- Beware of Sharp Edges: Sharp bones in cuts like T-bone steaks or bone-in pork chops can puncture the bag during the vacuum process. A simple trick is to wrap the sharp bone end with a small piece of folded parchment paper before sealing.
- Pre-Freeze Liquids and Soft Foods: Want to seal a heavily marinated steak or a delicate piece of fish without crushing it? Place the food on a tray and pop it in the freezer for 15-30 minutes. This will firm up the food and solidify the marinade, allowing you to get a perfect vacuum without sucking liquid into the machine or mashing your fish fillet.
|
Our Picks for the Best Food Vacuum Cealer in 2026
As an Amazon Associate, we earn from qualifying purchases.
|
||
| Num | Product | Action |
|---|---|---|
| 1 | Vacuum Sealer Machine Powerful 90Kpa Precision 6-in-1 Compact Food Preservation System with Cutter, 2 Bag Rolls & 5 Pre-cut Bags, Widened 12mm Sealing Strip, Dry&Moist Modes (Silver) |

|
| 2 | FoodSaver Compact Vacuum Sealer Machine with Airtight Bags and Roll - Ideal for Sous Vide and Airtight Food Storage, White |
|
| 3 | Chef Preserve Compact Vacuum Sealer for Food (Vacuum Sealer Machine + 30 Reusable Vacuum Bags) Powerful Handheld Vacuum Sealer Machine, Seal Meal Saver, Portable Food Sealer |
|
| 4 | Nesco Deluxe Food VS-12 Vacuum Sealer, 130 Watts, Kit Bags & Viewing Lid, Compact, Silver |
|
| 5 | FoodSaver Vacuum Sealer Machine, Automatic Bag Detection, Sous Vide Friendly, with sealer bags, roll, handheld vacuum sealer, black |
|
| 6 | NutriChef Automatic Vacuum Air Sealing System for Food Preservation with Starter Kit, Compact Design, Lab Tested, Dry & Moist Food Modes with Led Indicator Lights, Black |
|
| 7 | Vakumar Liquid Vacuum Sealer Machine, 90Kpa Vacuum Sealer Machine Preservation Dry/Moist/Liquid Modes, LED Indicator Light, Handle Locked Design, Built-in Cutter and Bag Storage, Removable Drip Tray |
|
| 8 | FoodSaver V4400 2-in-1 Vacuum Sealer Machine with Automatic Vacuum Sealer Bag Detection and Starter Kit |
|
| 9 |
|
|
| 10 | SEATAO VH5188 Automatic Vacuum Sealer Machine, 90kPa Multifunction Commercial Vacuum Food Sealer For Food Preservation, Dry & Moist & Food & Extended Modes, LED lights, Double Seal |
|
What Foods Can You Vacuum Seal for Sous Vide? (And What to Avoid)
You can sous vide almost anything, but some foods require a little extra care when it comes to vacuum sealing.
As a professional chef, I rely on vacuum sealing not just for preservation, but for precision. Sealing a delicate piece of halibut with lemon and dill ensures that every flake is perfectly cooked and infused with flavor. It removes the guesswork and delivers consistency our guests expect.
— Chef Antoine Dubois, Culinary Expert
Excellent Choices for Vacuum Sealing
- Proteins: Steak, chicken, pork, lamb, fish, and seafood are all perfect candidates.
- Firm Vegetables: Root vegetables like carrots, potatoes, and parsnips become incredibly tender and flavorful.
- Fruits: Sealing fruits like pears or apples with spices for infusions or desserts works beautifully.
- Eggs: For custards, crème brûlée, or Starbucks-style “egg bites,” sealing them in small canning jars and then placing the jars in a bag works wonders.
Use with Caution
- Cruciferous Vegetables: Vegetables like broccoli, Brussels sprouts, and cabbage can release gases during cooking, which may cause the bag to inflate. It’s best to blanch them quickly in boiling water before shocking them in an ice bath, drying them, and then sealing.
- Soft Cheeses: The pressure from a strong vacuum can crush delicate cheeses. Use the “pulse” function on your sealer if it has one, or stop the vacuum manually before it gets too tight.
- Garlic: Sous vide cooking happens at temperatures that aren’t high enough to kill botulism spores, which can thrive in the low-oxygen, low-acid environment created by raw garlic. It’s safer to use garlic powder or to cook with fresh garlic only when you plan to sear the food at a high temperature immediately after the water bath.
How Do I Choose the Right Vacuum Sealer for My Needs?
With so many models on the market, choosing the right one can feel daunting. Ask yourself these questions to narrow it down.
- How often will I use it? If you’re a sous vide enthusiast or a bulk shopper, investing in a more robust model with a stronger motor and a double-seal function is worth it. For occasional use, a reliable entry-level model will do the job just fine.
- What will I be sealing? If you plan on sealing primarily solids like steak and chicken, almost any external sealer will work. If you dream of sealing soups, stocks, and juicy marinades, you may want to save up for a chamber vacuum sealer.
- What is my budget? External sealers range from under $100 to a few hundred dollars. Chamber sealers are a significant investment, often starting around $400 and going up from there.
- How much counter space do I have? External models are relatively compact, while chamber sealers are bulky appliances. Consider your kitchen’s real estate before buying.
Frequently Asked Questions
Can I reuse sous vide bags after vacuum sealing?
Technically, yes, if you wash and sanitize them thoroughly. However, it can be difficult to clean them perfectly, and you’ll have to cut off the old seal, making the bag shorter each time. For food safety and convenience, it’s generally recommended to use a new bag for each cook.
What’s the difference between vacuum sealing and the water displacement method?
The water displacement method uses the pressure of water to force air out of a regular zip-top bag. While it’s better than nothing, it doesn’t remove as much air as a vacuum sealer, which can lead to floating bags and less efficient heat transfer.
Do I need special bags for vacuum sealing for sous vide?
Yes, absolutely. You must use bags that are specifically rated for both vacuum sealing and sous vide cooking. They are made from multi-ply, BPA-free plastic that is designed to withstand high temperatures for long periods without leaching chemicals into your food.
My vacuum sealer isn’t sealing properly. What’s wrong?
The most common culprit is moisture or food debris in the sealing area. Always ensure the top inch of the bag is clean and dry. Other issues could be a worn-out gasket or a wrinkle in the bag. Double-check your machine’s manual for troubleshooting tips.
Can you vacuum seal and freeze food for sous vide later?
Yes! This is one of the biggest advantages. You can season and seal several portions of your favorite protein, label them, and freeze them. When you’re ready to cook, you can often put the frozen bag directly into the preheated water bath—just add about 30-60 minutes to the cooking time.
Your Journey to Sous Vide Perfection
Mastering how to vacuum seal for sous vide cooking is the single most important skill you can develop to ensure flawless results with your circulator. It’s a simple process that pays huge dividends in flavor, texture, and convenience. By removing air, you create the perfect environment for heat to work its magic, transforming humble ingredients into culinary masterpieces. So, go ahead, fire up that water bath with confidence. Your perfectly cooked meal awaits.