Ever opened your freezer, excited for that beautiful steak you bought last month, only to find it covered in a crust of icy, unappetizing freezer burn? It’s a frustrating, all-too-common experience that feels like throwing money straight into the trash. This is where a vacuum sealer comes in, and if you’re reading this, you’ve probably heard the buzz. That’s why we’re diving deep with this comprehensive NutriChef Vacuum Sealer Review, giving you the real scoop on whether this popular kitchen gadget is the secret weapon your kitchen has been missing. We’re not just going to tell you if it’s good; we’re going to show you how it works, what it excels at, and if it’s truly the right fit for you.
So, How Does a Vacuum Sealer Actually Work?
At its core, a vacuum sealer does one simple but brilliant thing: it removes the air from a specially designed bag before creating an airtight seal. Why is this a game-changer? Air, or more specifically, oxygen, is the primary enemy of fresh food. It causes oxidation, which leads to spoilage, nutrient loss, and that dreaded freezer burn.
By sucking out the air, you dramatically slow down these processes. Think of it like putting your food into a state of suspended animation. The key benefits are impossible to ignore:
- Extended Shelf Life: Food can last up to 5 times longer than with traditional storage methods. Your frozen meats stay fresh for years, not months.
- Saves Money: You can buy in bulk, take advantage of sales, and drastically reduce food waste. That family pack of chicken breasts? Seal them individually and use them over time.
- Superior Food Protection: The airtight seal protects food from dehydration and freezer burn, preserving its flavor, texture, and nutritional value.
- Perfect for Meal Prep & Sous Vide: It’s the ultimate tool for portioning meals for the week or for preparing food for sous vide cooking, ensuring even cooking and incredible flavor infusion.
A Closer Look at the NutriChef Lineup
Before we get into the nitty-gritty review, it’s important to know that “NutriChef” isn’t just one model. They offer a range of sealers, generally falling into a few categories:
- Compact/Basic Models: These are perfect for beginners or those with limited counter space. They offer simple, one-touch operation for basic sealing needs.
- Mid-Range Models: Often, these include a built-in bag roll holder and cutter, which is a massive convenience. They might also feature more advanced settings like ‘Moist’ and ‘Dry’ food modes.
- Professional/Advanced Models: These boast stronger suction power, a stainless steel finish, and sometimes even a port for sealing canisters and marinating containers.
For this review, we focused our hands-on testing on one of their most popular mid-range models, as it represents the best balance of features and value for the average home user.
Our Hands-On NutriChef Vacuum Sealer Review
So, does it live up to the hype? We put it through its paces, sealing everything from delicate salmon fillets to hearty beef stew.
First Impressions and What’s in the Box
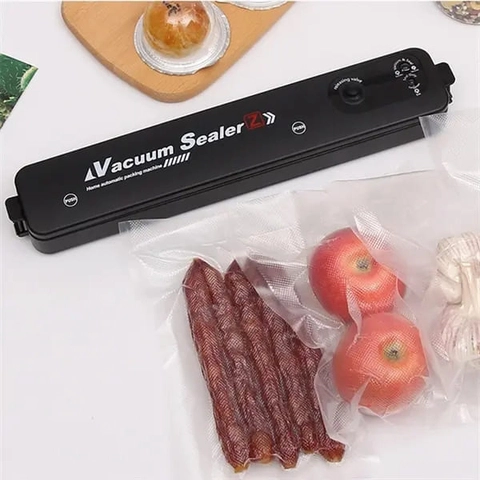
Right out of the box, the NutriChef feels solid yet lightweight. It’s compact enough that it doesn’t hog precious counter space. The design is clean and intuitive, with clearly labeled buttons. Our model came with a starter roll of vacuum bags, a few pre-cut bags, and an accessory hose for canisters—a nice touch that lets you start sealing immediately.
How to Use the NutriChef Sealer: A Step-by-Step Guide
Wondering how easy it is to operate? It’s surprisingly straightforward. Here’s the process from start to finish:
- Prepare Your Bag: If you’re using a roll, pull out enough material to hold your food plus an extra 3-4 inches. Use the built-in cutter to get a clean, straight edge.
- Make the First Seal: Place one of the open ends of the bag onto the sealing strip inside the machine. Close the lid firmly until you hear it click on both sides. Press the “Seal” button. The machine will create a bottom seal on your custom-sized bag in seconds.
- Fill the Bag: Place your food inside the bag. Be careful not to overfill it—leave at least 3 inches of space at the top.
- Vacuum and Seal: Open the lid, place the open end of the filled bag into the vacuum channel. Close the lid again, ensuring it clicks shut. Now, press the “Vacuum & Seal” button. You’ll hear the motor kick on as it sucks the air out. The bag will visibly tighten around the food.
- Let it Finish: The machine automatically stops the vacuum process once all the air is removed and then immediately seals the bag. The indicator lights will turn off when it’s done.
- Release and Store: Press the release buttons on the sides to open the lid, and voilà! You have a perfectly sealed package ready for the freezer, fridge, or pantry.
Performance: The Good, The Bad, and The Sealed
After sealing dozens of items, we got a clear picture of the NutriChef’s performance. The suction is impressively strong for a home-use model, creating a tight seal that clings to the food. The sealing strip creates a wide, secure seal that we found to be very reliable—no leaks or failures during our testing.
The dedicated ‘Moist’ and ‘Dry’ settings are genuinely useful. The ‘Dry’ setting is perfect for things like nuts, coffee beans, and bread, while the ‘Moist’ setting uses a slightly gentler vacuum and a longer sealing time to handle things like marinated meats or fish without sucking liquid into the machine.
As Chef Marco Bianchi, a proponent of modern food preservation techniques, often says, “A good vacuum seal is the difference between a steak that tastes fresh after six months in the freezer and one that’s simply… been frozen. It locks in the quality you paid for.”
The only minor drawback is the noise. Like most vacuum sealers, it’s not silent. It’s about as loud as a small blender, but the process is so quick (typically 10-20 seconds) that it’s hardly a deal-breaker.
|
Our Picks for the Best Food Vacuum Cealer in 2026
As an Amazon Associate, we earn from qualifying purchases.
|
||
| Num | Product | Action |
|---|---|---|
| 1 | FoodSaver V4400 2-in-1 Vacuum Sealer Machine with Automatic Vacuum Sealer Bag Detection and Starter Kit |

|
| 2 | SEATAO VH5188 Automatic Vacuum Sealer Machine, 90kPa Multifunction Commercial Vacuum Food Sealer For Food Preservation, Dry & Moist & Food & Extended Modes, LED lights, Double Seal |
|
| 3 | Nesco Deluxe Food VS-12 Vacuum Sealer, 130 Watts, Kit Bags & Viewing Lid, Compact, Silver |
|
| 4 | FoodSaver Compact Vacuum Sealer Machine with Airtight Bags and Roll - Ideal for Sous Vide and Airtight Food Storage, White |
|
| 5 | Chef Preserve Compact Vacuum Sealer for Food (Vacuum Sealer Machine + 30 Reusable Vacuum Bags) Powerful Handheld Vacuum Sealer Machine, Seal Meal Saver, Portable Food Sealer |
|
| 6 | Vakumar Liquid Vacuum Sealer Machine, 90Kpa Vacuum Sealer Machine Preservation Dry/Moist/Liquid Modes, LED Indicator Light, Handle Locked Design, Built-in Cutter and Bag Storage, Removable Drip Tray |
|
| 7 | FoodSaver Vacuum Sealer Machine, Automatic Bag Detection, Sous Vide Friendly, with sealer bags, roll, handheld vacuum sealer, black |
|
| 8 | Vacuum Sealer Machine Powerful 90Kpa Precision 6-in-1 Compact Food Preservation System with Cutter, 2 Bag Rolls & 5 Pre-cut Bags, Widened 12mm Sealing Strip, Dry&Moist Modes (Silver) |
|
| 9 |
|
|
| 10 | NutriChef Automatic Vacuum Air Sealing System for Food Preservation with Starter Kit, Compact Design, Lab Tested, Dry & Moist Food Modes with Led Indicator Lights, Black |
|
Tips and Tricks for Perfect Sealing Every Time
A great tool is only as good as the person using it. Here are some pro tips we’ve learned to get the absolute best results from your NutriChef:
- Pre-Freeze Liquids: If you’re sealing soups, stews, or broths, freeze them in a container first. Once solid, pop the block of food out and into a vacuum bag to seal. This prevents any liquid from being sucked into the machine.
- The Paper Towel Trick: For particularly moist foods like ground meat or fish, fold a small paper towel and place it inside the bag between the food and the seal area. It will absorb any excess moisture without affecting the seal.
- Give it Space: Always leave a few inches of extra space at the top of the bag. This ensures the machine can get a proper grip and create a tight vacuum.
- Double Seal for Security: For long-term freezer storage or for sous vide, it never hurts to press the “Seal” button one more time to create a second, redundant seal for extra peace of mind.
- Keep it Clean: Wipe down the vacuum channel and sealing strip after each use, especially after sealing moist foods. This ensures a perfect seal every time.
What Foods Should You Vacuum Seal (and What to Avoid)?
A vacuum sealer is incredibly versatile, but it’s not meant for everything.
Great Foods for Vacuum Sealing:
- Meats and Poultry: Beef, chicken, pork, and fish are perfect candidates.
- Hard Cheeses: Prevents mold and keeps them from drying out.
- Coffee Beans and Nuts: Keeps them from going stale.
- Dried Goods: Flour, sugar, pasta, and rice can be kept fresh for years.
- Fresh Vegetables: Ideal for produce you plan to freeze, like green beans, peas, and corn. Blanch them first for best results!
- Pre-made Meals: Perfect for meal prepping and portion control.
Foods to Avoid or Use Caution With:
- Soft Cheeses: The vacuum pressure can crush cheeses like brie or goat cheese.
- Cruciferous Vegetables (Raw): Vegetables like broccoli, cabbage, and cauliflower emit gases as they ripen. Sealing them raw can cause the bag to expand. It’s best to blanch or cook them first.
- Mushrooms and Garlic: For similar reasons, these can spoil more quickly due to anaerobic bacteria. It’s safer to cook them before sealing.
How Do You Choose the Right Vacuum Sealer?
Choosing the right sealer comes down to your lifestyle. A NutriChef vacuum sealer review wouldn’t be complete without helping you decide. Ask yourself:
- Are you a bulk shopper? If you frequent Costco or buy whole primals of beef, a model with a bag cutter and strong motor is a must.
- Are you a sous vide enthusiast? You’ll need a sealer that provides a consistently strong and reliable seal that can withstand a water bath. The NutriChef excels here.
- Do you have a small kitchen? A compact, basic model will do the trick without taking up valuable real estate.
For most people, a mid-range NutriChef model offers the perfect blend of functionality, power, and convenience without breaking the bank.
Frequently Asked Questions
Can you use any brand of bags with a NutriChef vacuum sealer?
Yes, for the most part. NutriChef sealers are compatible with most universal vacuum sealer bags and rolls, as long as they are the textured or embossed type designed for external vacuum sealers. Smooth bags will not work.
How do you clean a NutriChef vacuum sealer?
Cleaning is simple. Unplug the machine and use a damp cloth to wipe the exterior. The drip tray in the vacuum channel is often removable and can be washed with warm, soapy water. Ensure everything is completely dry before using it again.
Is the NutriChef vacuum sealer good for sous vide cooking?
Absolutely. Its strong suction and reliable, wide seal make it an excellent choice for sous vide. The airtight seal ensures no water gets into the bag and that heat is transferred efficiently to the food.
What is the difference between the ‘Dry’ and ‘Moist’ settings?
The ‘Dry’ setting is the default and uses maximum vacuum pressure for a quick seal. The ‘Moist’ setting is more intelligent; it uses a slightly gentler vacuum and extends the sealing time to ensure a strong seal on wet foods without pulling liquid into the machine’s motor.
How much longer does food last when sealed with a NutriChef?
The difference is significant. For example, frozen meat stored in a standard freezer bag might get freezer burn in 3-6 months. When properly vacuum-sealed with a NutriChef, it can last for 2-3 years while maintaining excellent quality.
The Final Verdict
After extensive use, our final NutriChef vacuum sealer review is overwhelmingly positive. It’s a reliable, user-friendly, and effective tool that delivers on its promise to preserve food, save money, and reduce waste. It strikes an excellent balance between affordability and performance, making it a fantastic choice for anyone from curious beginners to seasoned meal preppers. If you’re tired of watching your hard-earned money go to waste from spoiled food and freezer burn, investing in a NutriChef vacuum sealer is one of the smartest decisions you can make for your kitchen.