So, you’re ready to change the way you store food, save a ton of money, and finally put an end to freezer burn. That’s fantastic. Your search to buy a vacuum sealer at Walmart has brought you to the right place. Vacuum sealers work by removing over 97% of oxygen from food packaging, extending food shelf life by three to five times compared to traditional methods like zipper bags, and preventing freezer burn by eliminating air contact with food moisture. This guide will help you choose the right machine and become a pro at using it from day one.
How Do Vacuum Sealers Actually Work?
Ever wonder what the magic is behind a vacuum sealer? It’s actually pretty simple, but the results are game-changing. For complete vacuum sealers library on this site.
A vacuum sealer works by removing the air from a specially designed bag or container before sealing it airtight. Why is this so important? The primary enemies of fresh food are oxygen and moisture. Oxygen leads to oxidation, which causes food to spoil, lose its nutritional value, and develop off-flavors. It’s the same reason a cut apple turns brown. By removing the air, you’re essentially pressing pause on the spoilage process.
Expert Take: According to food preservation specialist Dr. Anna Peterson, “Removing over 97% of the oxygen from the packaging environment can extend the shelf life of food by three to five times compared to traditional storage methods like zipper bags or plastic containers. It’s a cornerstone of modern food preservation.”
This process drastically slows down the growth of mold, yeast, and bacteria, and it completely prevents freezer burn, which happens when air comes into contact with the moisture on your food’s surface.
What Are the Main Types of Vacuum Sealers at Walmart?
When you walk into Walmart or browse their website, you’ll generally encounter two main categories of vacuum sealers. Understanding the difference is the first step to making a smart choice.
1. External (or Edge) Vacuum Sealers
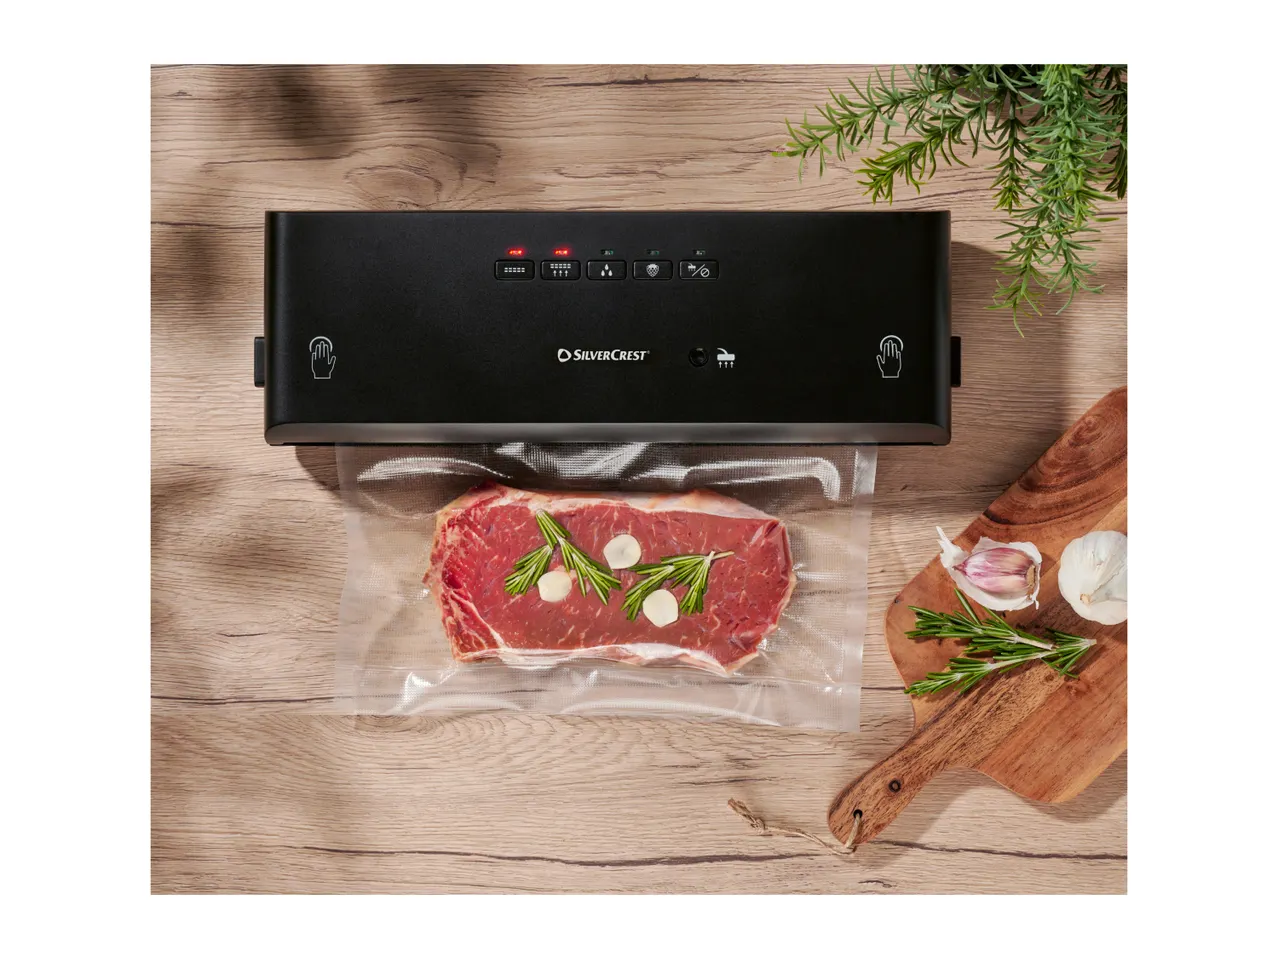
This is the most common type you’ll find for home use. They’re countertop machines where you place the open end of the bag into a channel or “trough” on the edge of the appliance. You close the lid, and the machine sucks the air out before using a heat bar to melt the bag shut.
- Best for: General-purpose sealing. Great for sealing solid foods like cuts of meat, cheese, vegetables, and dry goods. They’re also fantastic for preparing meals for sous vide cooking.
- Pros: Relatively affordable, widely available, and easy to use.
- Cons: Can be a bit tricky with very moist or liquid-heavy foods, as the liquid can get sucked into the vacuum channel.
2. Handheld Vacuum Sealers
|
Our Picks for the Best Food Vacuum Cealer in 2026
As an Amazon Associate, we earn from qualifying purchases.
|
||
| Num | Product | Action |
|---|---|---|
| 1 | FoodSaver Compact Vacuum Sealer Machine with Airtight Bags and Roll - Ideal for Sous Vide and Airtight Food Storage, White |

|
| 2 | Anova Culinary Precision Vacuum Sealer Pro, Includes Large Bag Roll (19ft), Wet & Dry Dual Food Vacuum Sealer Machine for Sous Vide and Long-Term Storage, 2-Year Warranty |
|
| 3 | Vacuum Sealer Machine Powerful 90Kpa Precision 6-in-1 Compact Food Preservation System with Cutter, 2 Bag Rolls & 5 Pre-cut Bags, Widened 12mm Sealing Strip, Dry&Moist Modes (Silver) |
|
| 4 | Chef Preserve Compact Vacuum Sealer for Food (Vacuum Sealer Machine + 30 Reusable Vacuum Bags) Powerful Handheld Vacuum Sealer Machine, Seal Meal Saver, Portable Food Sealer |
|
| 5 | FoodSaver V4400 2-in-1 Vacuum Sealer Machine with Automatic Vacuum Sealer Bag Detection and Starter Kit |
|
| 6 | FoodSaver Vacuum Sealer Machine, Automatic Bag Detection, Sous Vide Friendly, with sealer bags, roll, handheld vacuum sealer, black |
|
| 7 | NutriChef Automatic Vacuum Air Sealing System for Food Preservation with Starter Kit, Compact Design, Lab Tested, Dry & Moist Food Modes with Led Indicator Lights, Black |
|
| 8 | Nesco Deluxe Food VS-12 Vacuum Sealer, 130 Watts, Kit Bags & Viewing Lid, Compact, Silver |
|
| 9 | Vakumar Liquid Vacuum Sealer Machine, 90Kpa Vacuum Sealer Machine Preservation Dry/Moist/Liquid Modes, LED Indicator Light, Handle Locked Design, Built-in Cutter and Bag Storage, Removable Drip Tray |
|
| 10 | SEATAO VH5188 Automatic Vacuum Sealer Machine, 90kPa Multifunction Commercial Vacuum Food Sealer For Food Preservation, Dry & Moist & Food & Extended Modes, LED lights, Double Seal |
|
These are smaller, more portable devices. They work with special bags that have a built-in valve or with reusable containers. You simply press the handheld sealer over the valve, and it sucks the air out.
- Best for: Short-term storage, delicate items, and foods you access frequently (like deli meats or cheese). They’re also great for marinating, as you can quickly reseal the container.
- Pros: Compact, easy to store, and excellent for reusable containers.
- Cons: Generally less powerful than countertop models and not ideal for long-term freezer storage.
Your Step-by-Step Guide to Using a Vacuum Sealer
Got your new machine? Awesome! Let’s get it unboxed and sealing. While every model is slightly different, the basic process for an external sealer is the same.
- Prepare Your Bag: Use a roll to create a custom-sized bag or grab a pre-sized one. If making your own, place one end of the roll material on the sealing strip, close the lid, and press the “Seal” button. This creates the bottom of your bag.
- Fill the Bag: Place your food inside. Be sure to leave at least 3 inches (about 7-8 cm) of empty space at the top. This “headspace” is crucial for getting a good seal.
- Position the Bag: Open the lid of the sealer and carefully place the open end of the bag into the vacuum channel or drip tray. Make sure the bag is flat and has no wrinkles along the area to be sealed.
- Lock and Seal: Close the lid firmly until it clicks into place. Some models have locking levers on the side.
- Start the Process: Press the “Vacuum & Seal” button. The machine will whir to life, sucking the air out. You’ll see the bag shrink tightly around the food. Once all the air is removed, the machine will automatically stop the vacuum and the heat bar will engage to seal the bag.
- Release and Inspect: Wait for the seal indicator light to turn off. Then, unlock the lid and remove your perfectly sealed package. Check the seal—it should be clear, solid, and without any gaps.
Pro Tips for Vacuum Sealing Like a Seasoned Chef
After years of sealing everything from garden harvests to bulk meat purchases, I’ve learned a few tricks that make a world of difference.
- Pre-Freeze Liquids: Want to seal soup, broth, or marinades? Pour them into the bag, stand it upright in the freezer for a few hours until solid, then vacuum seal. No more mess!
- Blanch Your Veggies: For long-term freezer storage, blanch vegetables like broccoli, green beans, and carrots first. This stops the enzymes that can cause them to lose flavor and color over time.
- Create a “Liquid Barrier”: When sealing moist foods like ground beef or fish, fold a paper towel and place it inside the bag, between the food and the seal area. It will absorb any excess moisture without getting sucked into the machine.
- Protect from Sharp Edges: Sealing foods with sharp bones or edges? Wrap the sharp parts in a small piece of paper towel or wax paper before sealing to prevent them from puncturing the bag.
What Foods Can You Vacuum Seal (And What to Avoid)?
Knowing what works and what doesn’t is key to getting the most out of your machine.
Foods That Are GREAT for Vacuum Sealing:
- Meats and Poultry: Beef, chicken, pork, and fish stay incredibly fresh. It’s perfect for buying in bulk.
- Hard Cheeses: Prevents mold and keeps them from drying out.
- Dry Goods: Coffee beans, nuts, flour, and pasta are protected from moisture and staleness.
- Fresh Vegetables: Carrots, green beans, peppers, and more (remember to blanch first for freezing).
- Prepped Meals: Seal individual portions for quick weeknight dinners.
Foods to AVOID or Use Caution With:
- Cruciferous Vegetables: Raw broccoli, cauliflower, cabbage, and Brussels sprouts emit gases as they ripen. Sealing them raw can cause the bag to inflate and the veggies to spoil. Always blanch or cook them first.
- Soft Cheeses: Cheeses like brie or ricotta don’t do well, as the process can crush them and alter their texture.
- Fresh Mushrooms: Similar to cruciferous veggies, raw mushrooms ripen and can spoil quickly in an anaerobic (oxygen-free) environment. It’s better to cook them first.
- Garlic and Onions: These also release gases and can develop a more pungent, unpleasant flavor when sealed raw.
How to Choose the Right Machine When You Buy a Vacuum Sealer at Walmart
Okay, this is the big question. With several options on the shelf, how do you pick? Focus on these three things.
### What’s Your Budget?
Walmart offers a range of models, from budget-friendly options around $40-$60 to more robust machines over $100. A basic model is perfect for occasional use, but if you plan on sealing a lot (like after a hunting trip or a huge garden harvest), investing in a more durable model with a stronger motor is worth it.
### How Often Will You Use It?
If you’re sealing a few times a week, look for a model with a built-in bag roll holder and cutter. This is a massive convenience feature that saves a lot of time and hassle. For someone who only seals once a month, a more basic model without these bells and whistles is perfectly fine.
### What Features Matter to You?
Consider these extra features that can make your life easier:
- Moist/Dry Food Settings: This adjusts the sealing level to prevent crushing delicate items or to provide a stronger seal for moist foods.
- Built-in Cutter: A huge time-saver for making custom-sized bags.
- Accessory Port: This allows you to use your machine with reusable containers and bottle stoppers, expanding its versatility.
- Removable Drip Tray: This makes cleanup a breeze, especially if you accidentally suck up some liquid. It’s a feature I highly recommend.
Here’s a quick comparison of potential food storage times to show you the impact:
| Food Item | Traditional Freezer Storage (Zipper Bag) | Vacuum Sealed Freezer Storage |
|---|---|---|
| Beef/Pork | 6-12 months | 2-3 years |
| Poultry | 9 months | 2-3 years |
| Fish | 3-6 months | 2 years |
| Coffee Beans | 3 months | 1-2 years |
| Vegetables | 8-10 months | 2-3 years |
Frequently Asked Questions
Q: Can I reuse vacuum sealer bags?
A: Yes, you can, but only if they previously held dry goods like nuts or bread. Wash them thoroughly and let them dry completely. Never reuse bags that have held raw meat, fish, or greasy foods due to the risk of bacteria.
Q: Do I need to buy special bags for my vacuum sealer?
A: Absolutely. Vacuum sealer bags are made from a multi-layer material designed to block oxygen and moisture and withstand the sealing process. Regular plastic bags or zipper bags will not work.
Q: Is it worth it to buy a vacuum sealer at Walmart?
A: For most households, yes! A vacuum sealer helps you save significant money by buying in bulk, reducing food waste, and extending the life of your groceries. The convenience and quality of food preservation make it a worthwhile investment.
Q: Can you vacuum seal liquids?
A: It’s tricky with external sealers but possible. The best method is to pre-freeze the liquid until it’s solid before sealing. This prevents the liquid from being sucked into the machine’s motor.
Q: Will a vacuum sealer crush delicate foods like bread or chips?
A: It can if you use the full vacuum setting. Many models have a “pulse” function or a “seal only” button. You can use the pulse function to manually control the amount of air removed, stopping before the item gets crushed, and then hit “seal.”
Your Next Step in Freshness
You now have all the knowledge you need to confidently walk into a store, browse online, and buy a vacuum sealer at Walmart that fits your life perfectly. You know how they work, what to look for, and how to use one like you’ve been doing it for years. This simple appliance is more than just a gadget; it’s a tool that empowers you to take control of your kitchen, reduce waste, and enjoy fresher, more flavorful food for longer. Go ahead, make the investment. Your wallet and your taste buds will thank you.
Get our weekly buyer guide
Practical specs, not advice. Unsubscribe anytime.
I got one of the cheaper models from Walmart, hoping to prevent freezer burn on my garden veggies. It works okay for most things, but sometimes I have trouble getting a consistent seal, especially with moist foods. I wish I’d paid more attention to the different types mentioned, as I think a more powerful one might have been better. It’s still better than zipper bags, though.
This machine is a lifesaver! I used to dread buying meat in bulk because it would always get freezer burn so fast. Now, after learning about how vacuum sealers eliminate air contact with food moisture, I seal everything right away. It’s amazing how much longer everything stays fresh, and I’m saving a ton of money. Definitely recommend getting one if you’re on the fence.
I picked up a FoodSaver from Walmart a few weeks ago, and it’s been pretty great. The explanation of how vacuum sealers remove oxygen was super helpful in understanding why my food stays fresh. I’ve been sealing leftovers and bulk meat purchases, and it really does extend the shelf life. My only minor complaint is that the bags can be a bit pricey, but the savings on food waste probably balance it out.
I finally decided to buy a vacuum sealer at Walmart after years of dealing with freezer burn on everything. This guide really helped me understand how they work and which type would be best for my needs. My produce and meats are lasting so much longer now, and I’m definitely saving money by not throwing out spoiled food. It’s a total game-changer for meal prep!